1999-2004 Honda Odyssey Cable Repair Instructions
If you did not purchase from THANOSZX7R on eBay.com, CarCableguy on Amazon.com, or from CarCableGuy.com you purchased counterfeit items from low quality Chinese manufacturing that is violating our copyright images and texts on this website. Please help us in limiting the low quality products and report them as counterfeit in Amazon or eBay and demand your money back.
-
Model
1999-2004
Scroll Down for All the Instructions


Please Follow all the Instructions
If you did not purchase from THANOSZX7R on eBay, CarCableguy on Amazon, or from CarCableGuy.com you purchased counterfeit items from low quality Chinese manufacturing that is violating our copyright images and texts on this website. Please help us in limiting the low quality products and report them as counterfeit in Amazon or eBay and demand your money back.

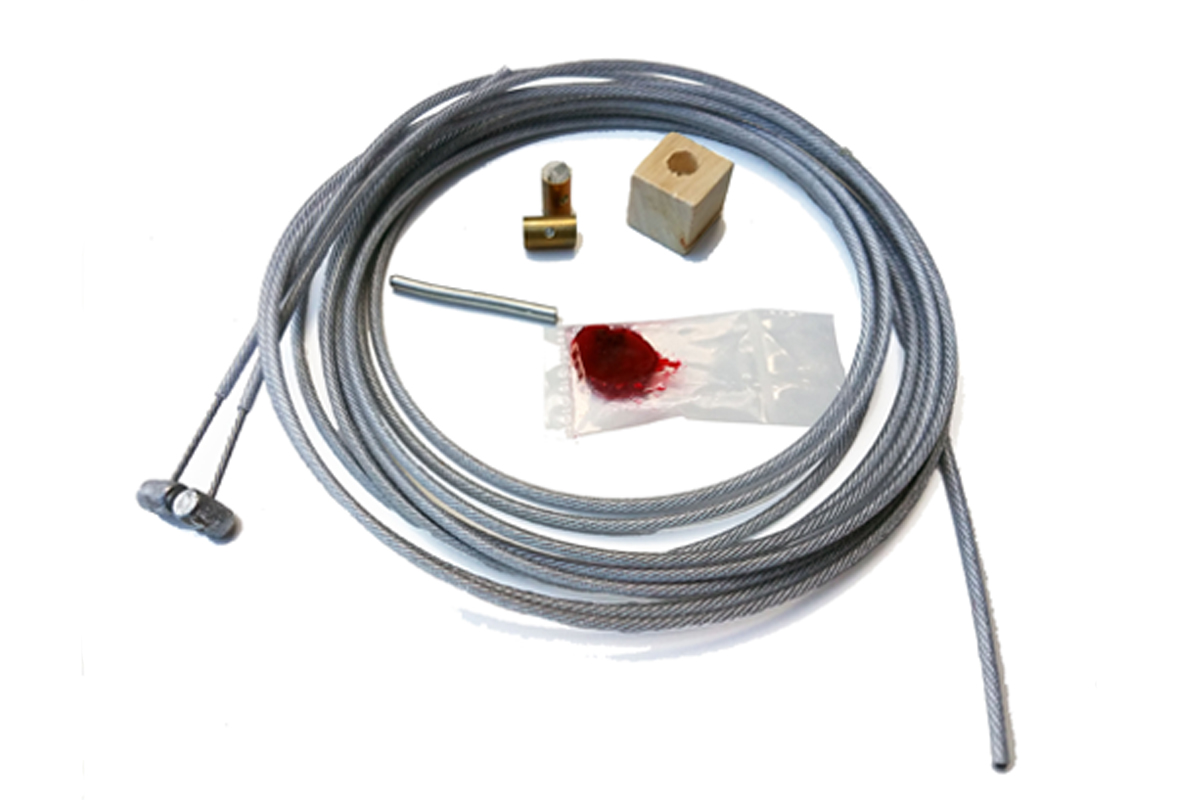
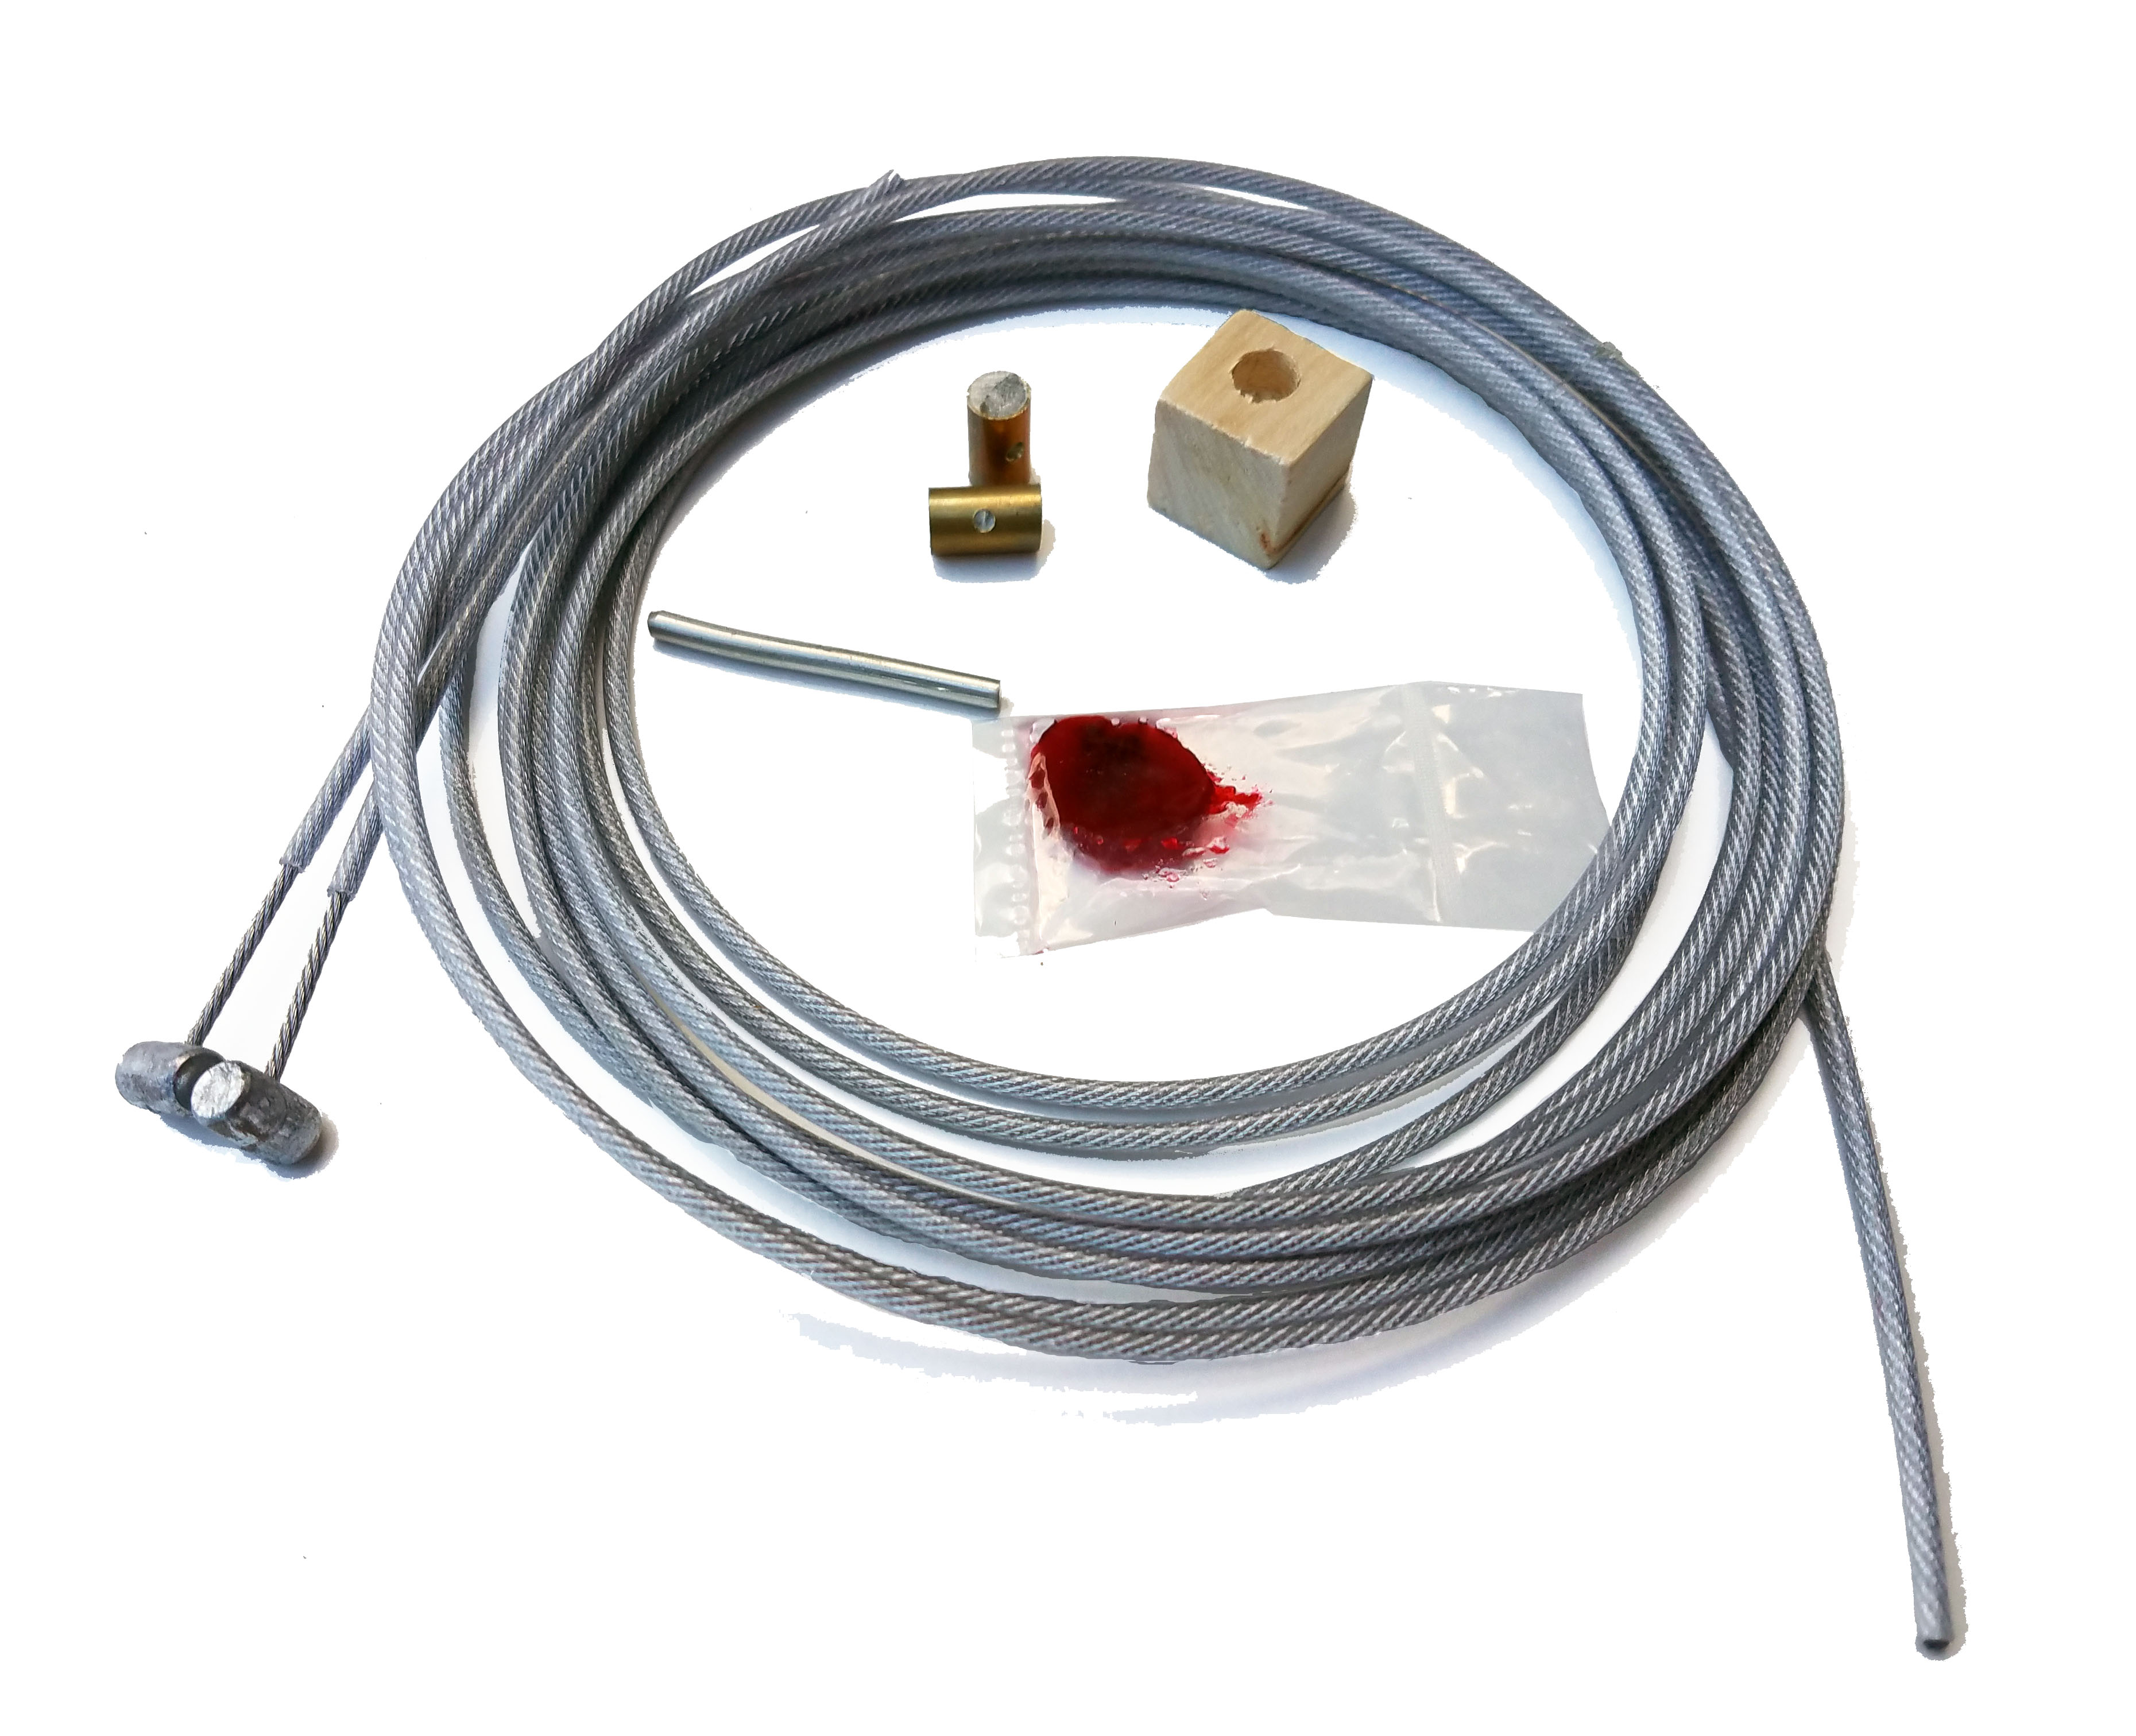
Enclosed in the kit is:
1 (one) long steel cable
1 (one) short steel cable
2 (two) barrel ends
1 (one) piece of lead-free steel solder
1 (one) small amount of chemically correct soldering flux
1 (one) wood block heat sink
2 replacement bushings
Please follow these instructions carefully in order to ensure a proper repair that will continue to function for years to come.
Additional tools required:
Soldering iron find a link above in the "Links to Needed Tools" above
Tweezers or needle nose pliers are helpful in holding the hot items
We also recommend replacing the bracket that holds the door on at the middle of the rear of the door. Here are some links for the On Amazon or higher quality can be found at you local auto parts store but make sure you get the right ones. I don't have links to those.

Green colored cable is used for better visibility in the pictures
If you have thoughts of making this kit yourself, it will require a specialized flux that can chemically etch the steel in the wire, a formulated solder that will adhere to the molecular level of the steel, and a desire to have it fail and you reattempt the process over and over until you succeed.
We have done all of that for you so your installation is quick, easy, and backed with an unconditional One Year Warranty.
If you would like to use your door manually, you can merely disconnect the power to the motor and cut out the factory cables. The door will operate and close like a manual door.
READ THE INSTRUCTIONS!
YOU REALLY SHOULD.
It will save the most valuable resource. No, not the environment, your time. Please watch the videos too.
If any part gets damaged or if the cable gets a kink in it please contact us for replacement, most of the time this will be covered by the warranty. It will save you time trying to get the damaged part to work.
USE ONLY THE SOLDER AND FLUX PROVIDED AND DO NOT CONTAMINATE IT WITH OTHER SOLDER OR FLUX.
This is specifically for Stainless steel wire and any other may cause a weaker solder joint and require a full replacement of the cables.
IF YOU ARE USING A SOLDERING IRON THAT IS NOT NEW, PRIOR TO SOLDERING LET YOUR SOLDERING IRON HEAT UP AND THEN USE A WET CLOTH TO WIPE ALL THE OLD SOLDER OFF THE TIP. THIS MUST BE DONE AS TO NOT CROSS CONTAMINATE SOLDERS.
Trust us on this one, Not doing this can cause a weak solder joint due to impurities in the stainless-steel solder.
Open your vehicle up to the point you are at the cable motor, disconnect the power, and remove the over plate. (IT IS CRITICALLY IMPORTANT TO DISCONNECT THE POWER)
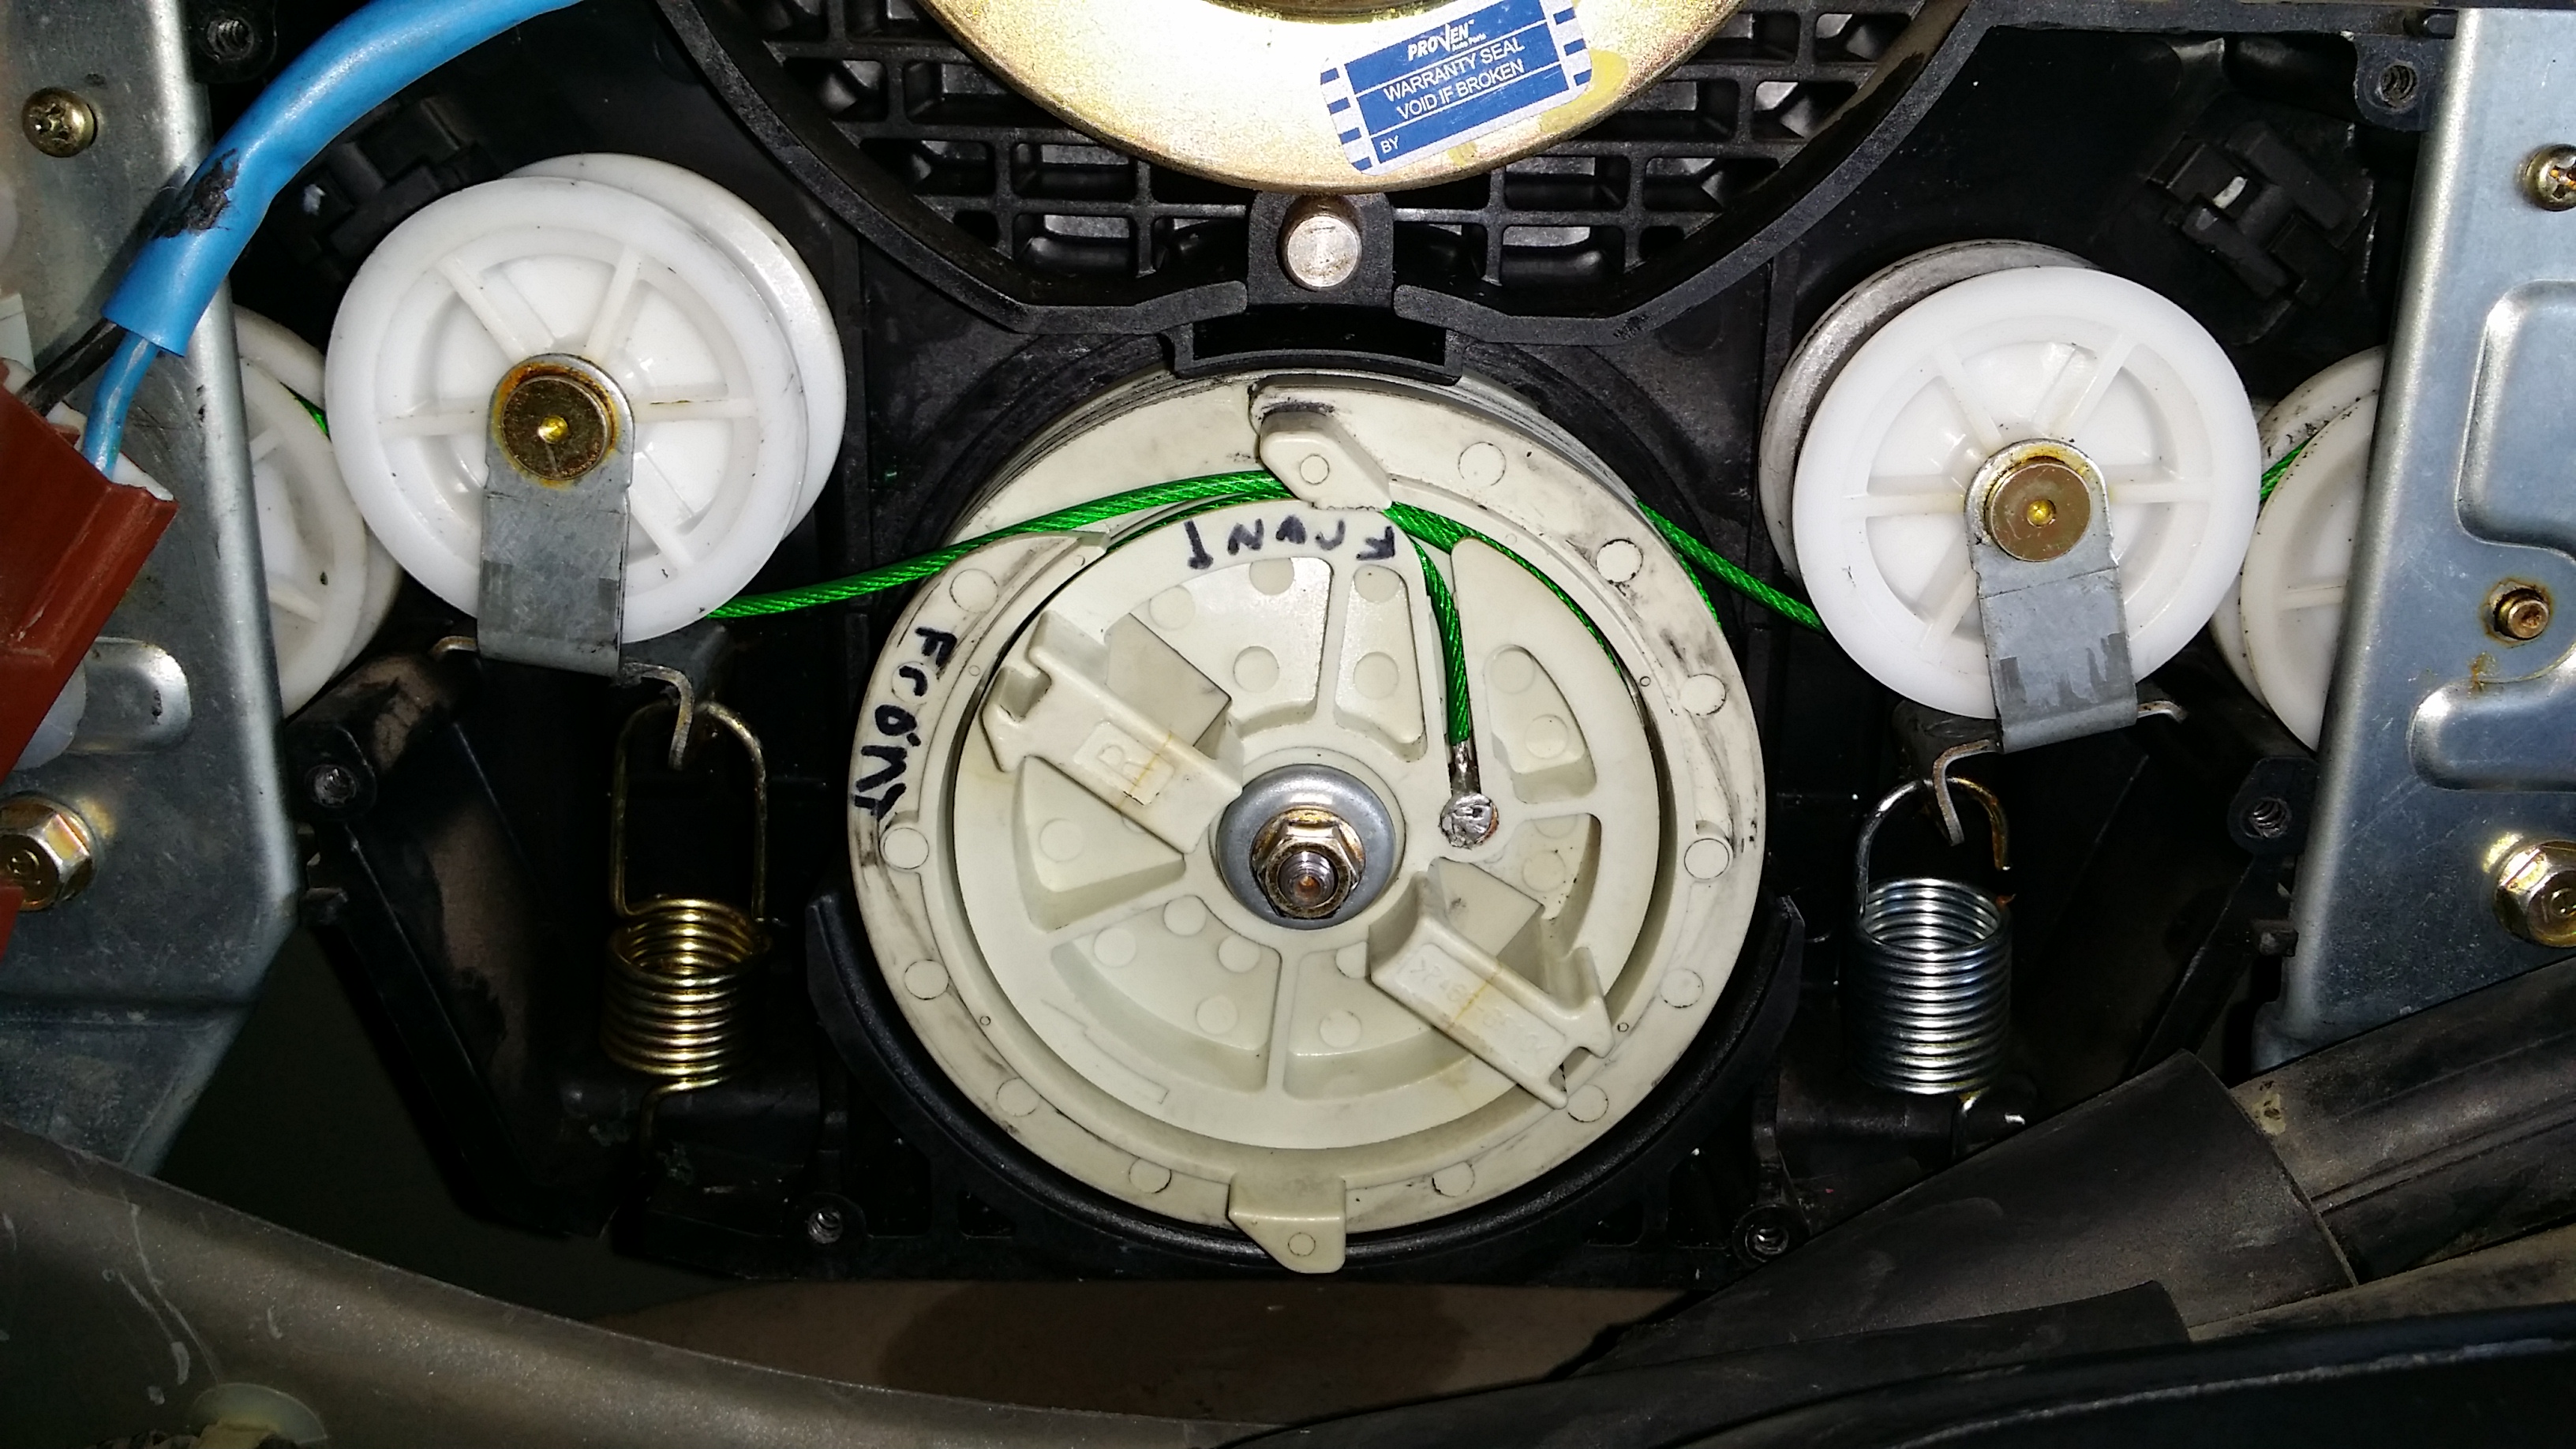
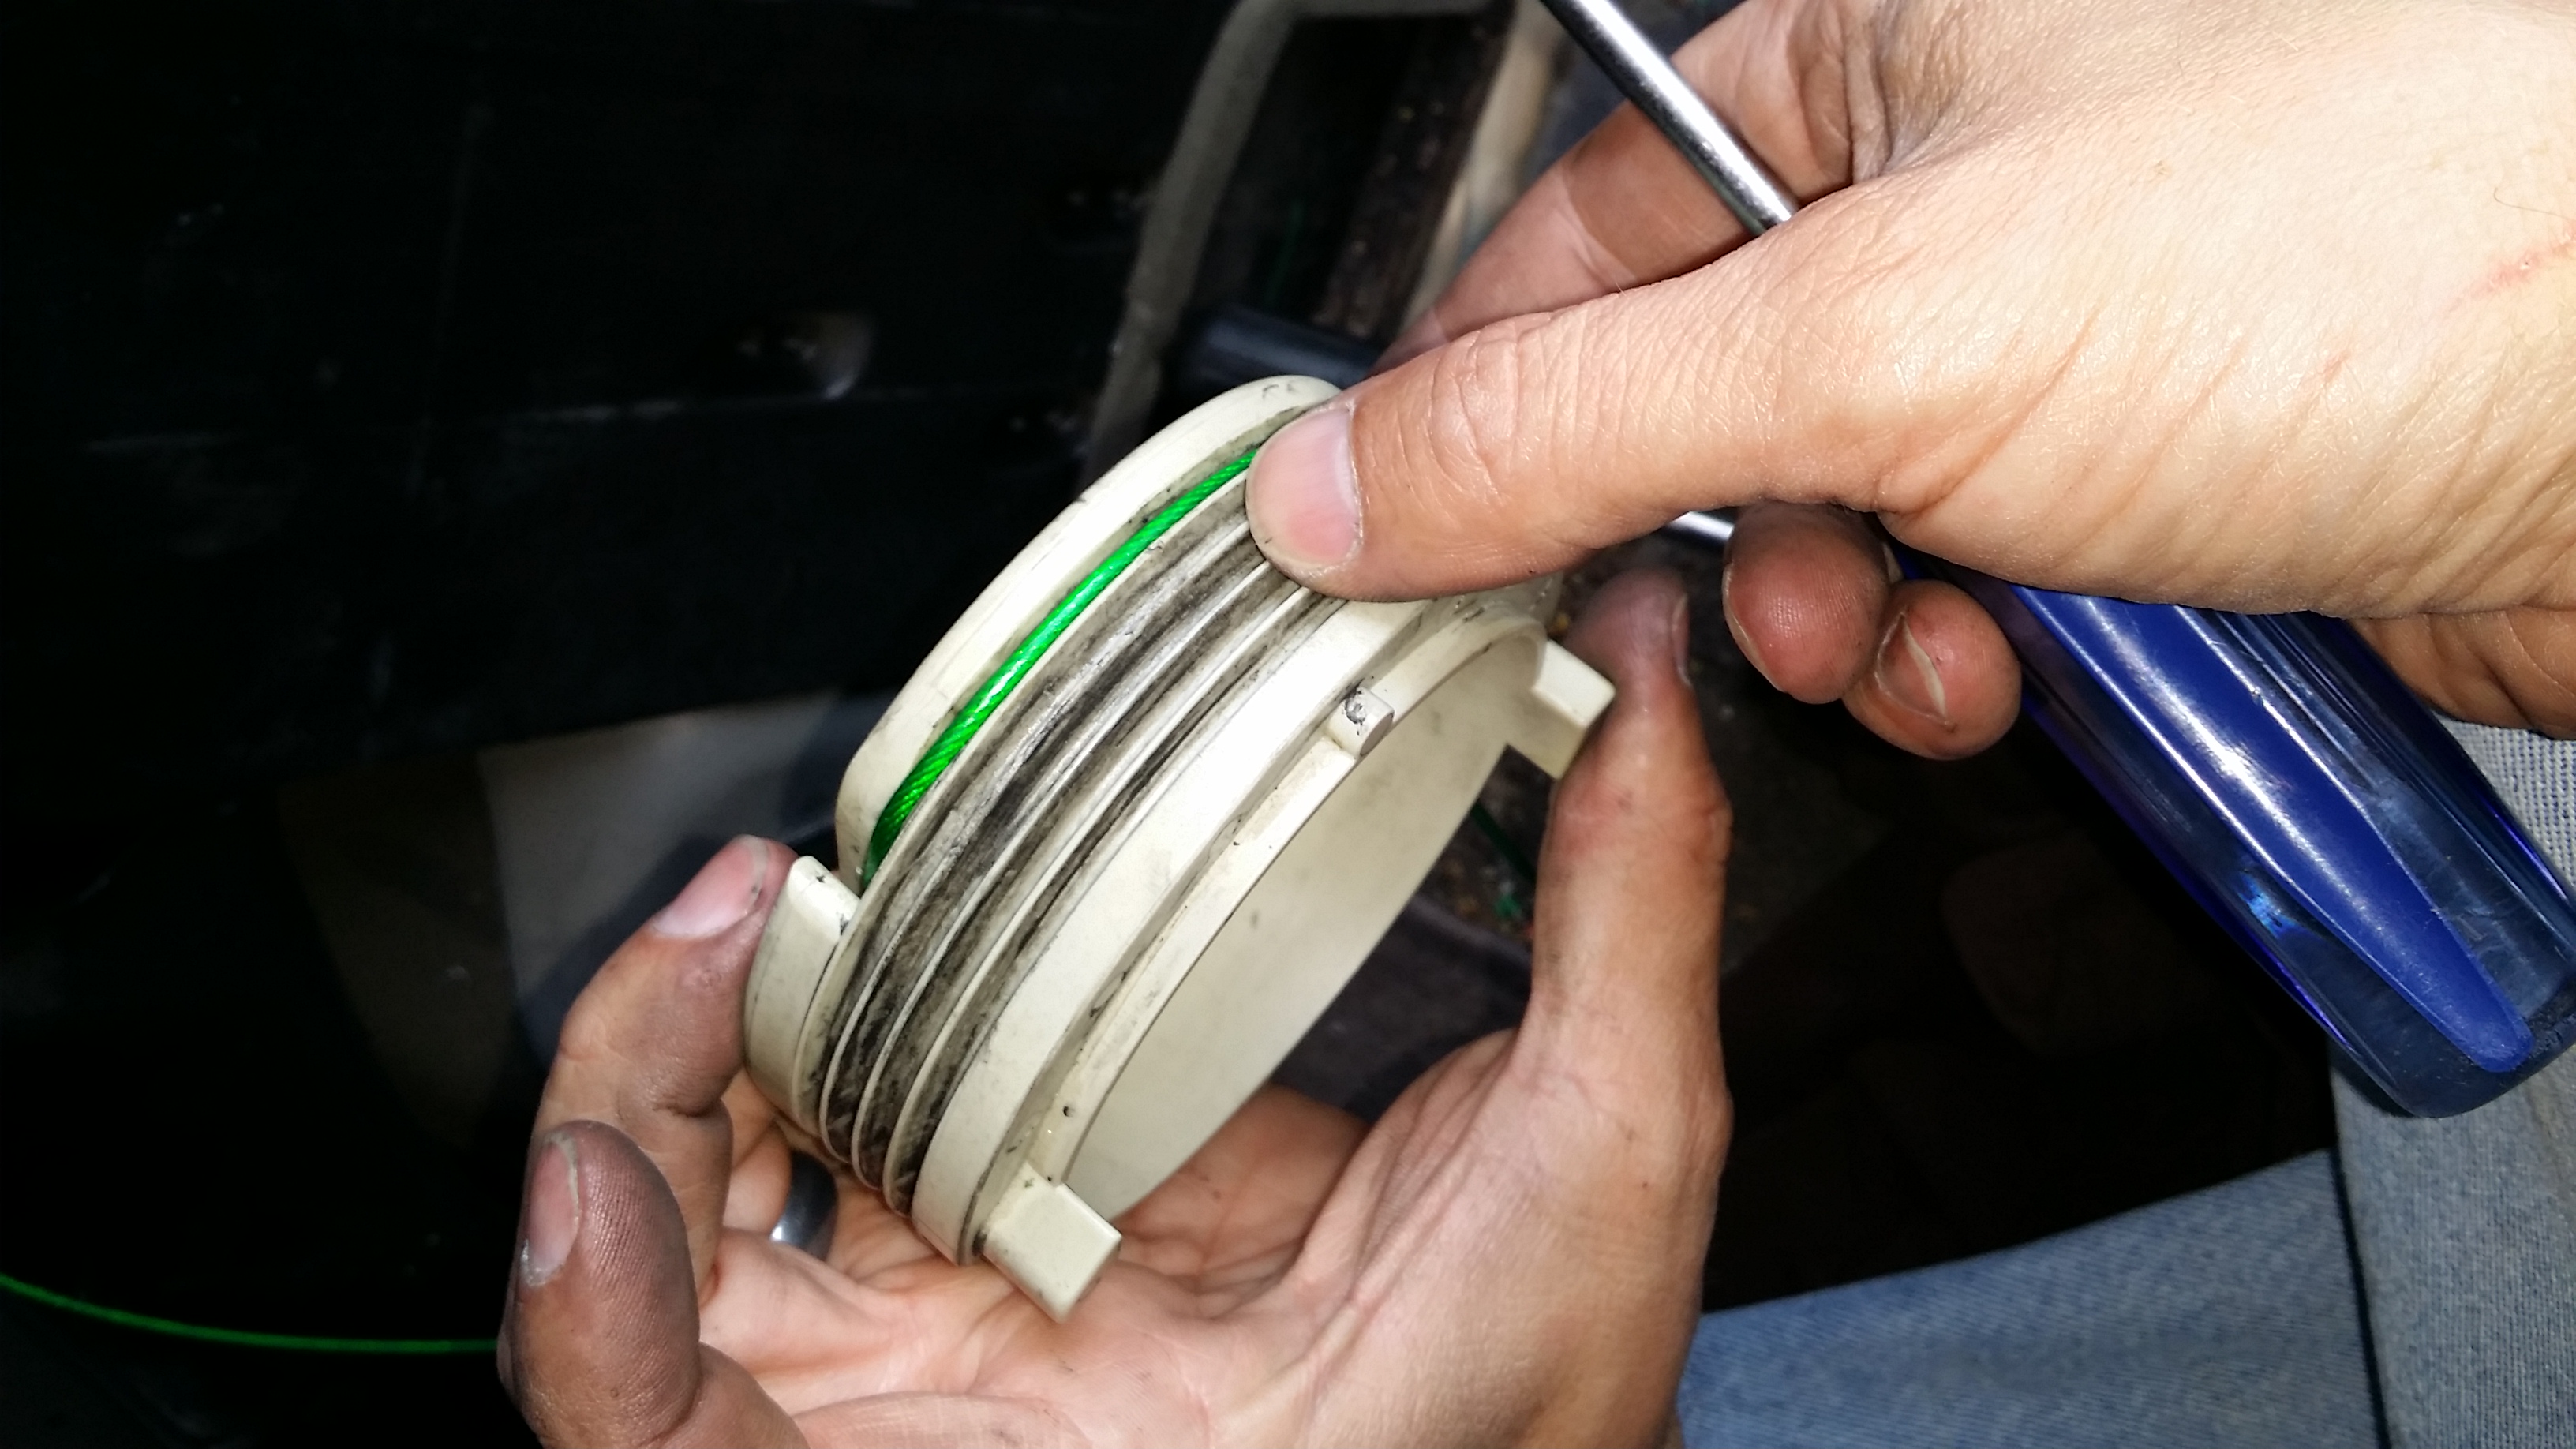
When you get to the motor assembly it will look like this. Remove the cover plate.
Watch the video to get a better understanding of how it works, before you start!
Remove the pulley bolt at the front in the center and remove the center pulley section. Remove the outer pulley section, this part may be more difficult to remove, but a little bit of effort will pull it off the spindle. NOTE HOW THE CABLES ARE ROUTED, you might even want to take a picture to be absolutely sure.
Remove both cables, you can cut the cable and pull it out from each side. and take them out of the vehicle. You want to save the part on the end of the cable at the door. It is a bushing on the end. You will see a picture of the bushings in the next steps
Open your kit. Follow these instructions and we can provide you with any assistance if you have questions. Contact@CarCableGuy.com
- You need to remove the factory bushing and install it on the new cable.
- Then click it over the already installed cable end.
- Now you will thread the cable in the housings. Do not remove the vinyl cable casing from the cable. If you do it will cause wear on the pulley.
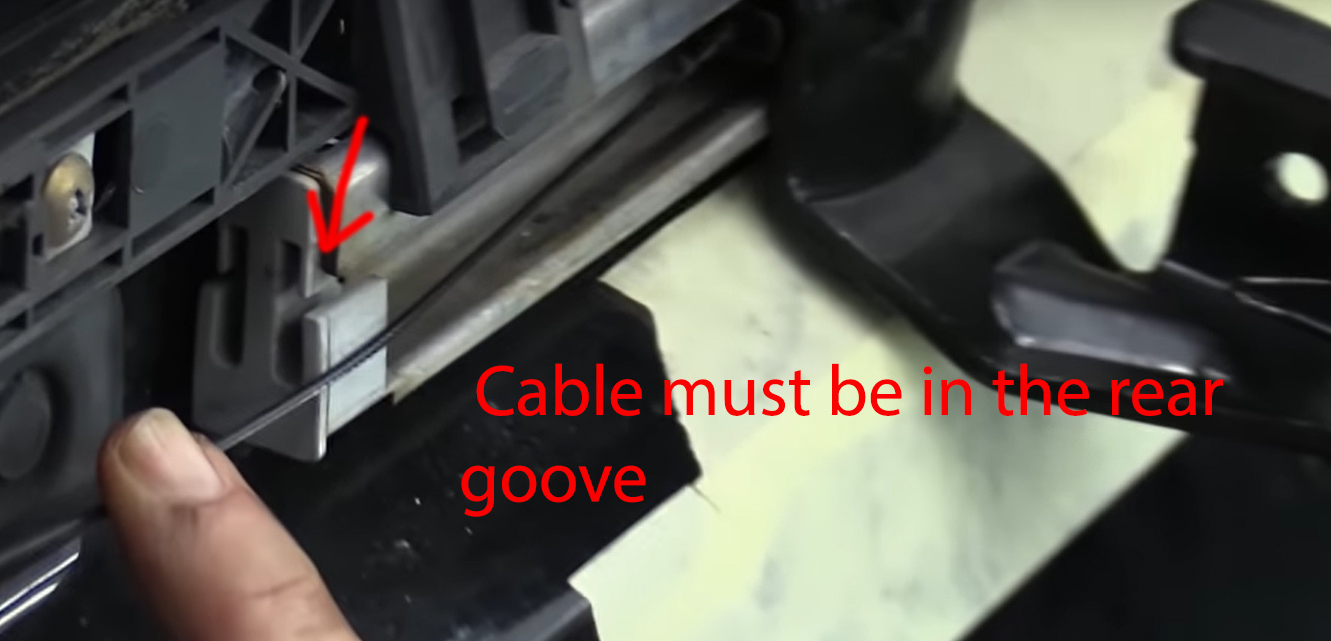
- The cable will go into the housing end at the door and will go around an internal pulley to then thread into the long part of the housing.
- The short cable goes in the housing at the front of the car, the long one at the housing at the rear of the car.
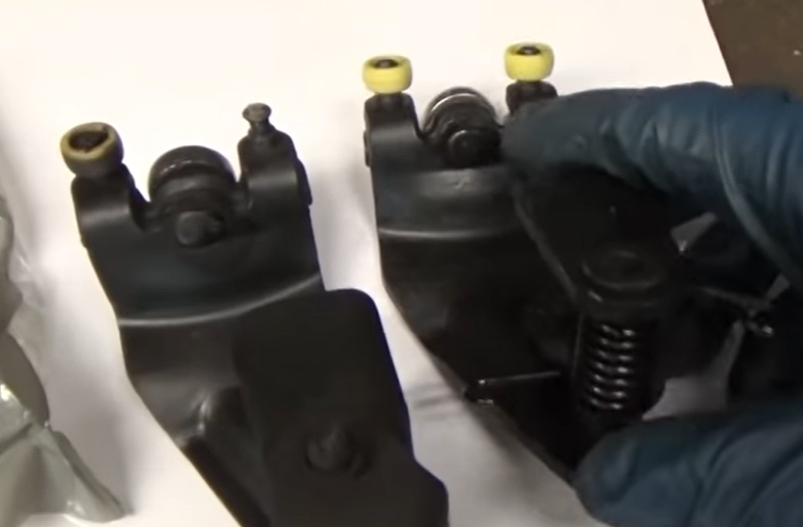
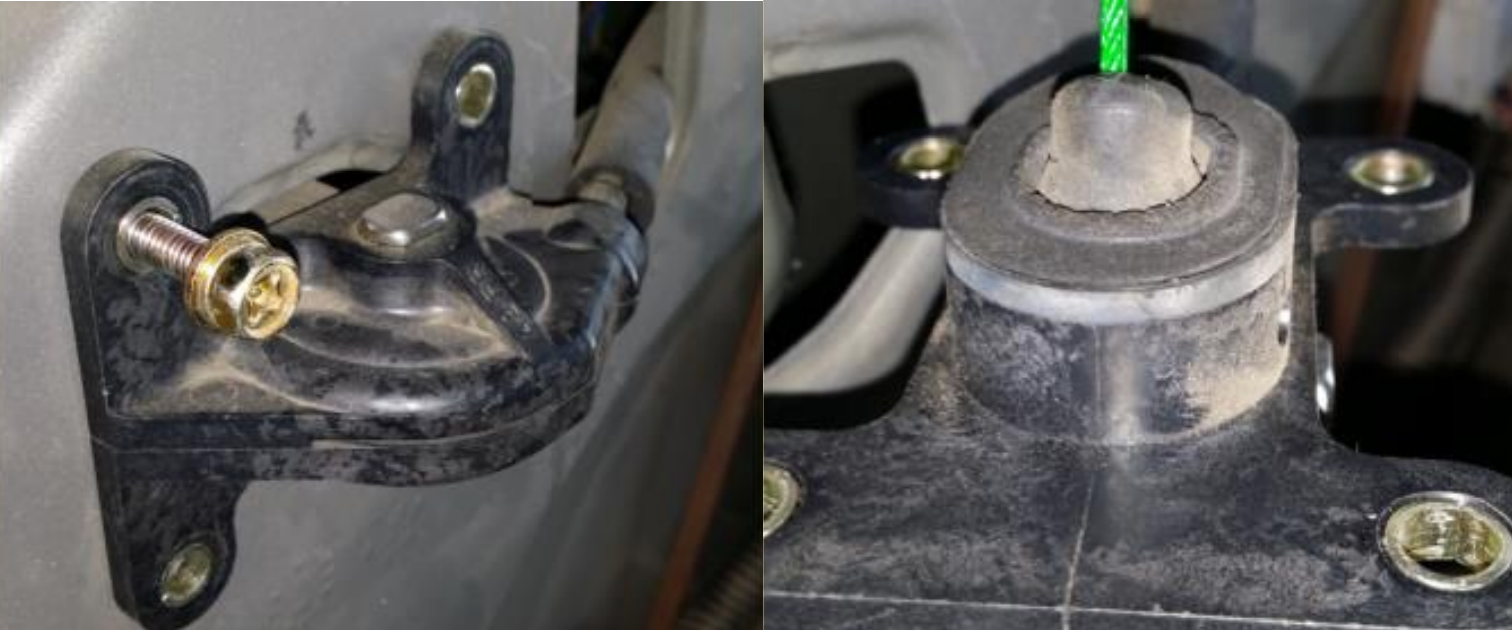
- Want to make sure not to kink any of the cable, but you have to have a slight bend in the end that you will thread into the housing to ensure it will get past the housing lip that is inside the housing assembly after the pulley.
- You will put a slight bend into the cable end that you thread in. below is an example showing the amount of bend to put in the cable. DO NOT KINK IT. No tools are required to make this slight bend.
- You will have to thread it in in and out to get it to clear the lip in the area noted in the second picture above.
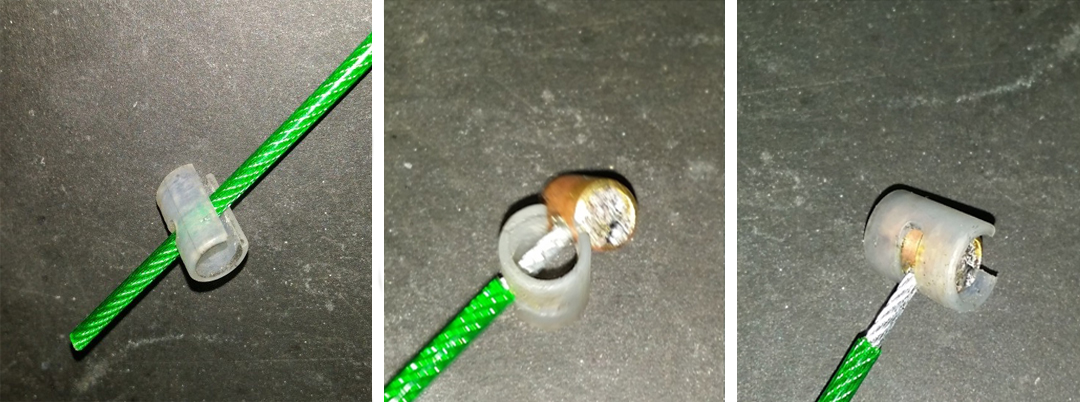
- Once you get it threaded through the housing to the pulley area you will want to remove a small section of the green cable casing. Remove the casing approximately the length shown below. It is not necessary to be exact.

- You will then dip your wire end into the red flux included in the kit as shown.

TIP TO SAVE TIME
You may want to wait and complete one cable at a time as to not set it down and get it dirty. If you do, wipe it all off with a clean rag and dip it into the flux again. Dirt makes solder not stick to the steel, so you want it clean as possible.
Next you will insert the wire into the barrel ends provided. Yes, this will have to be done inside the vehicle. Take appropriate precautions that you have something to set your soldering iron on that will not burn. This is all on you to be smart and if you start a fire, it is all on you.
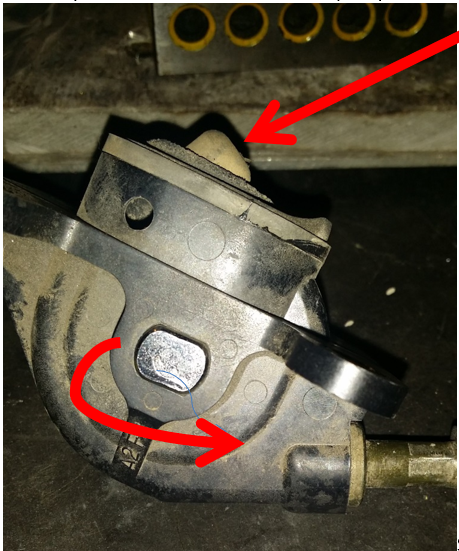
- Put the barrel end into the provided wood block and insert the cable end into the barrel end. The block will not burn, but will act as a heat sink and keep the liquid solder from leaking out the bottom. (Note: no flux is visible on the cable as this is merely an example)
Hold the cable in perpendicular to the barrel end. You might need a third hand or a friend to assist in holding the cable.
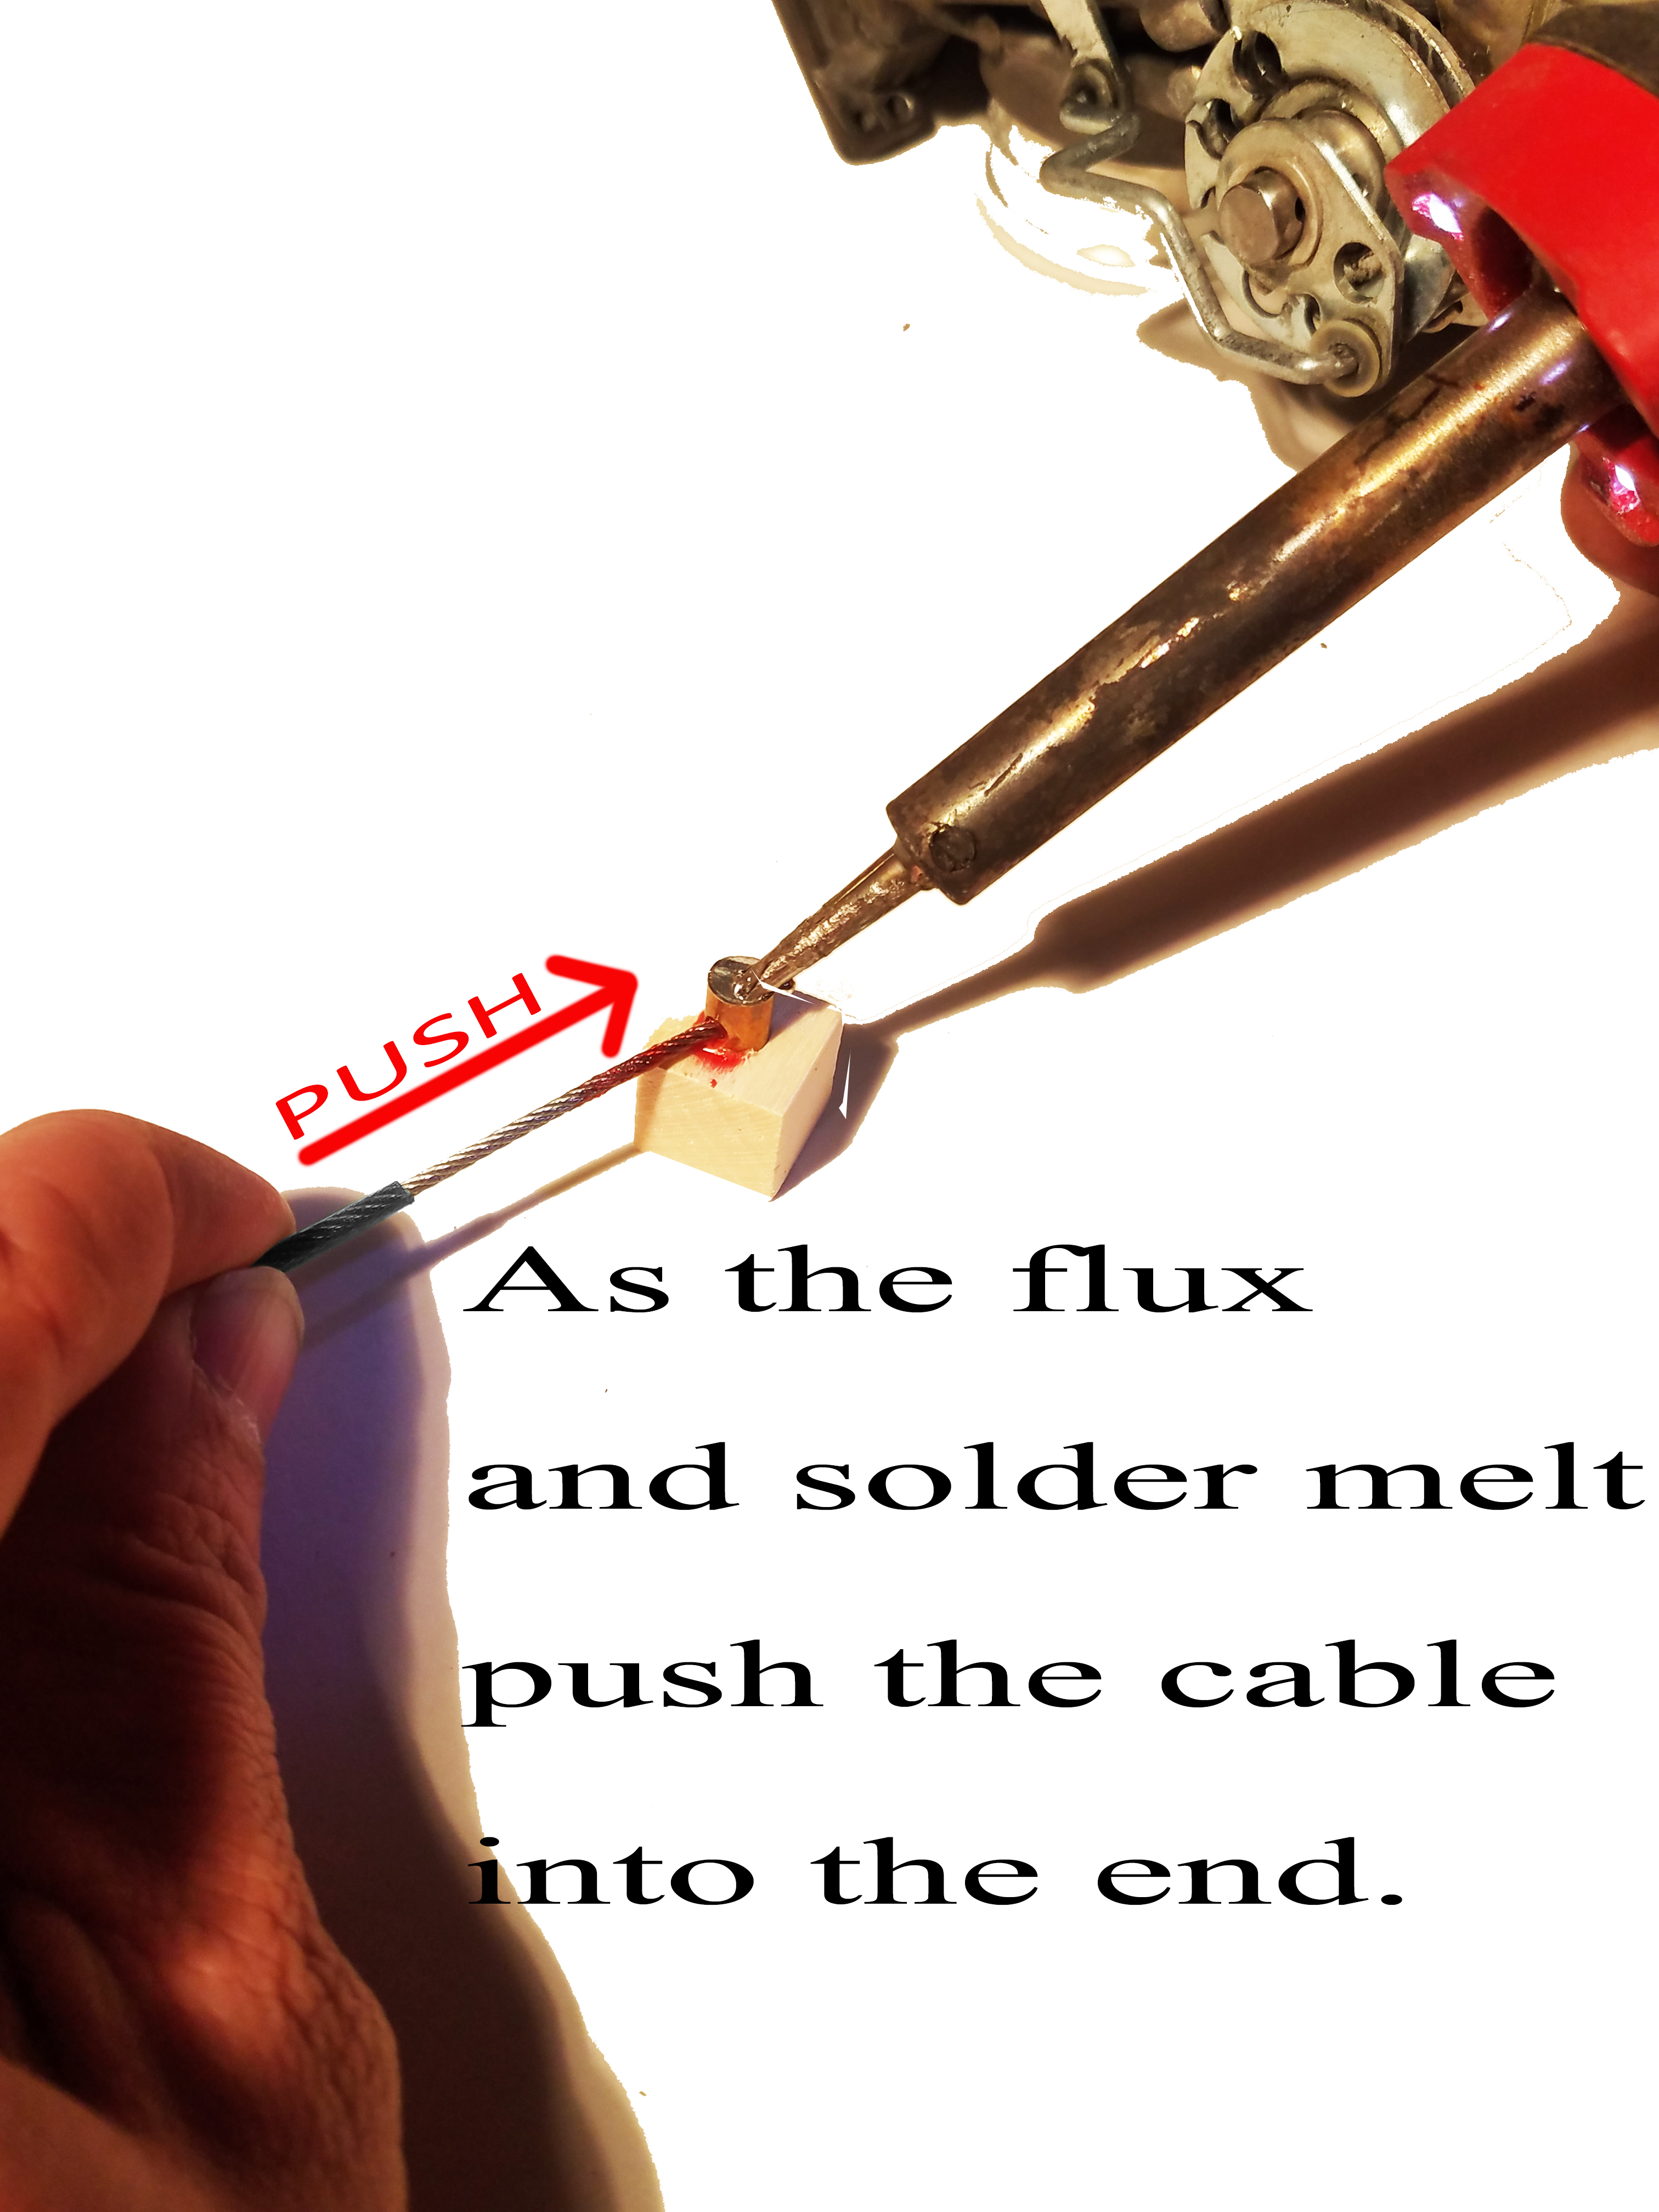
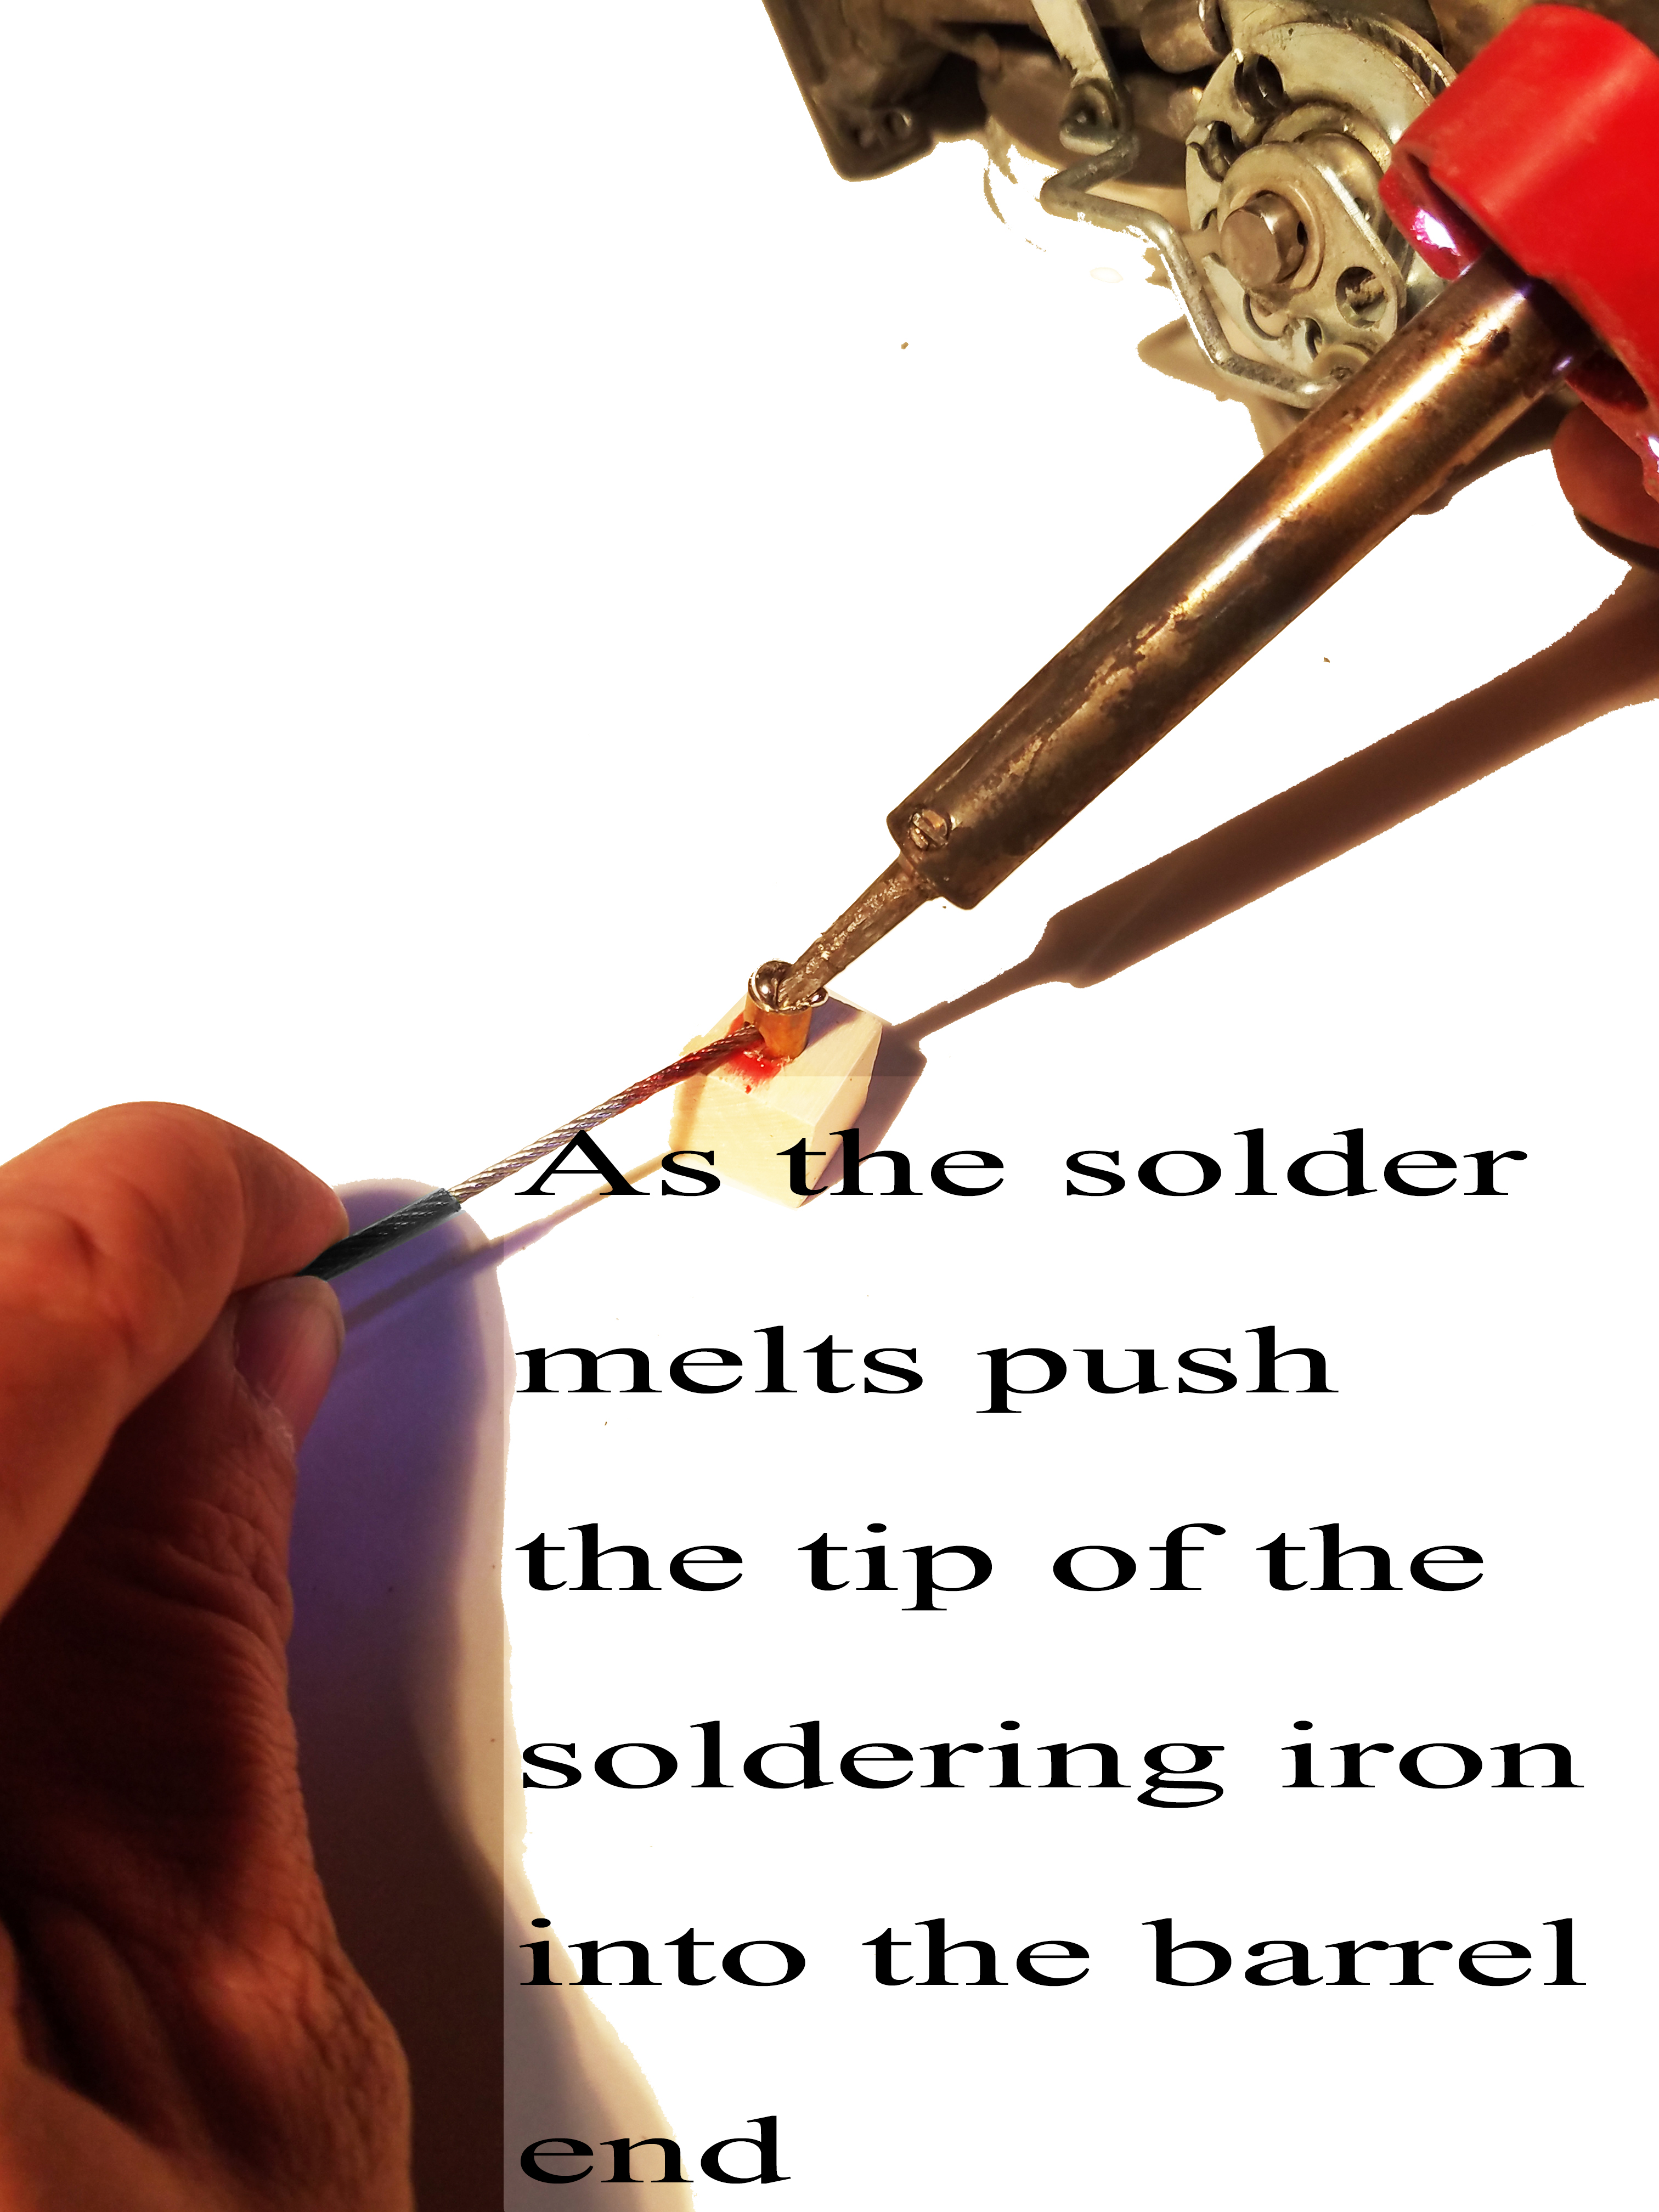
- Put the soldering iron tip onto the top of the barrel end as shown.
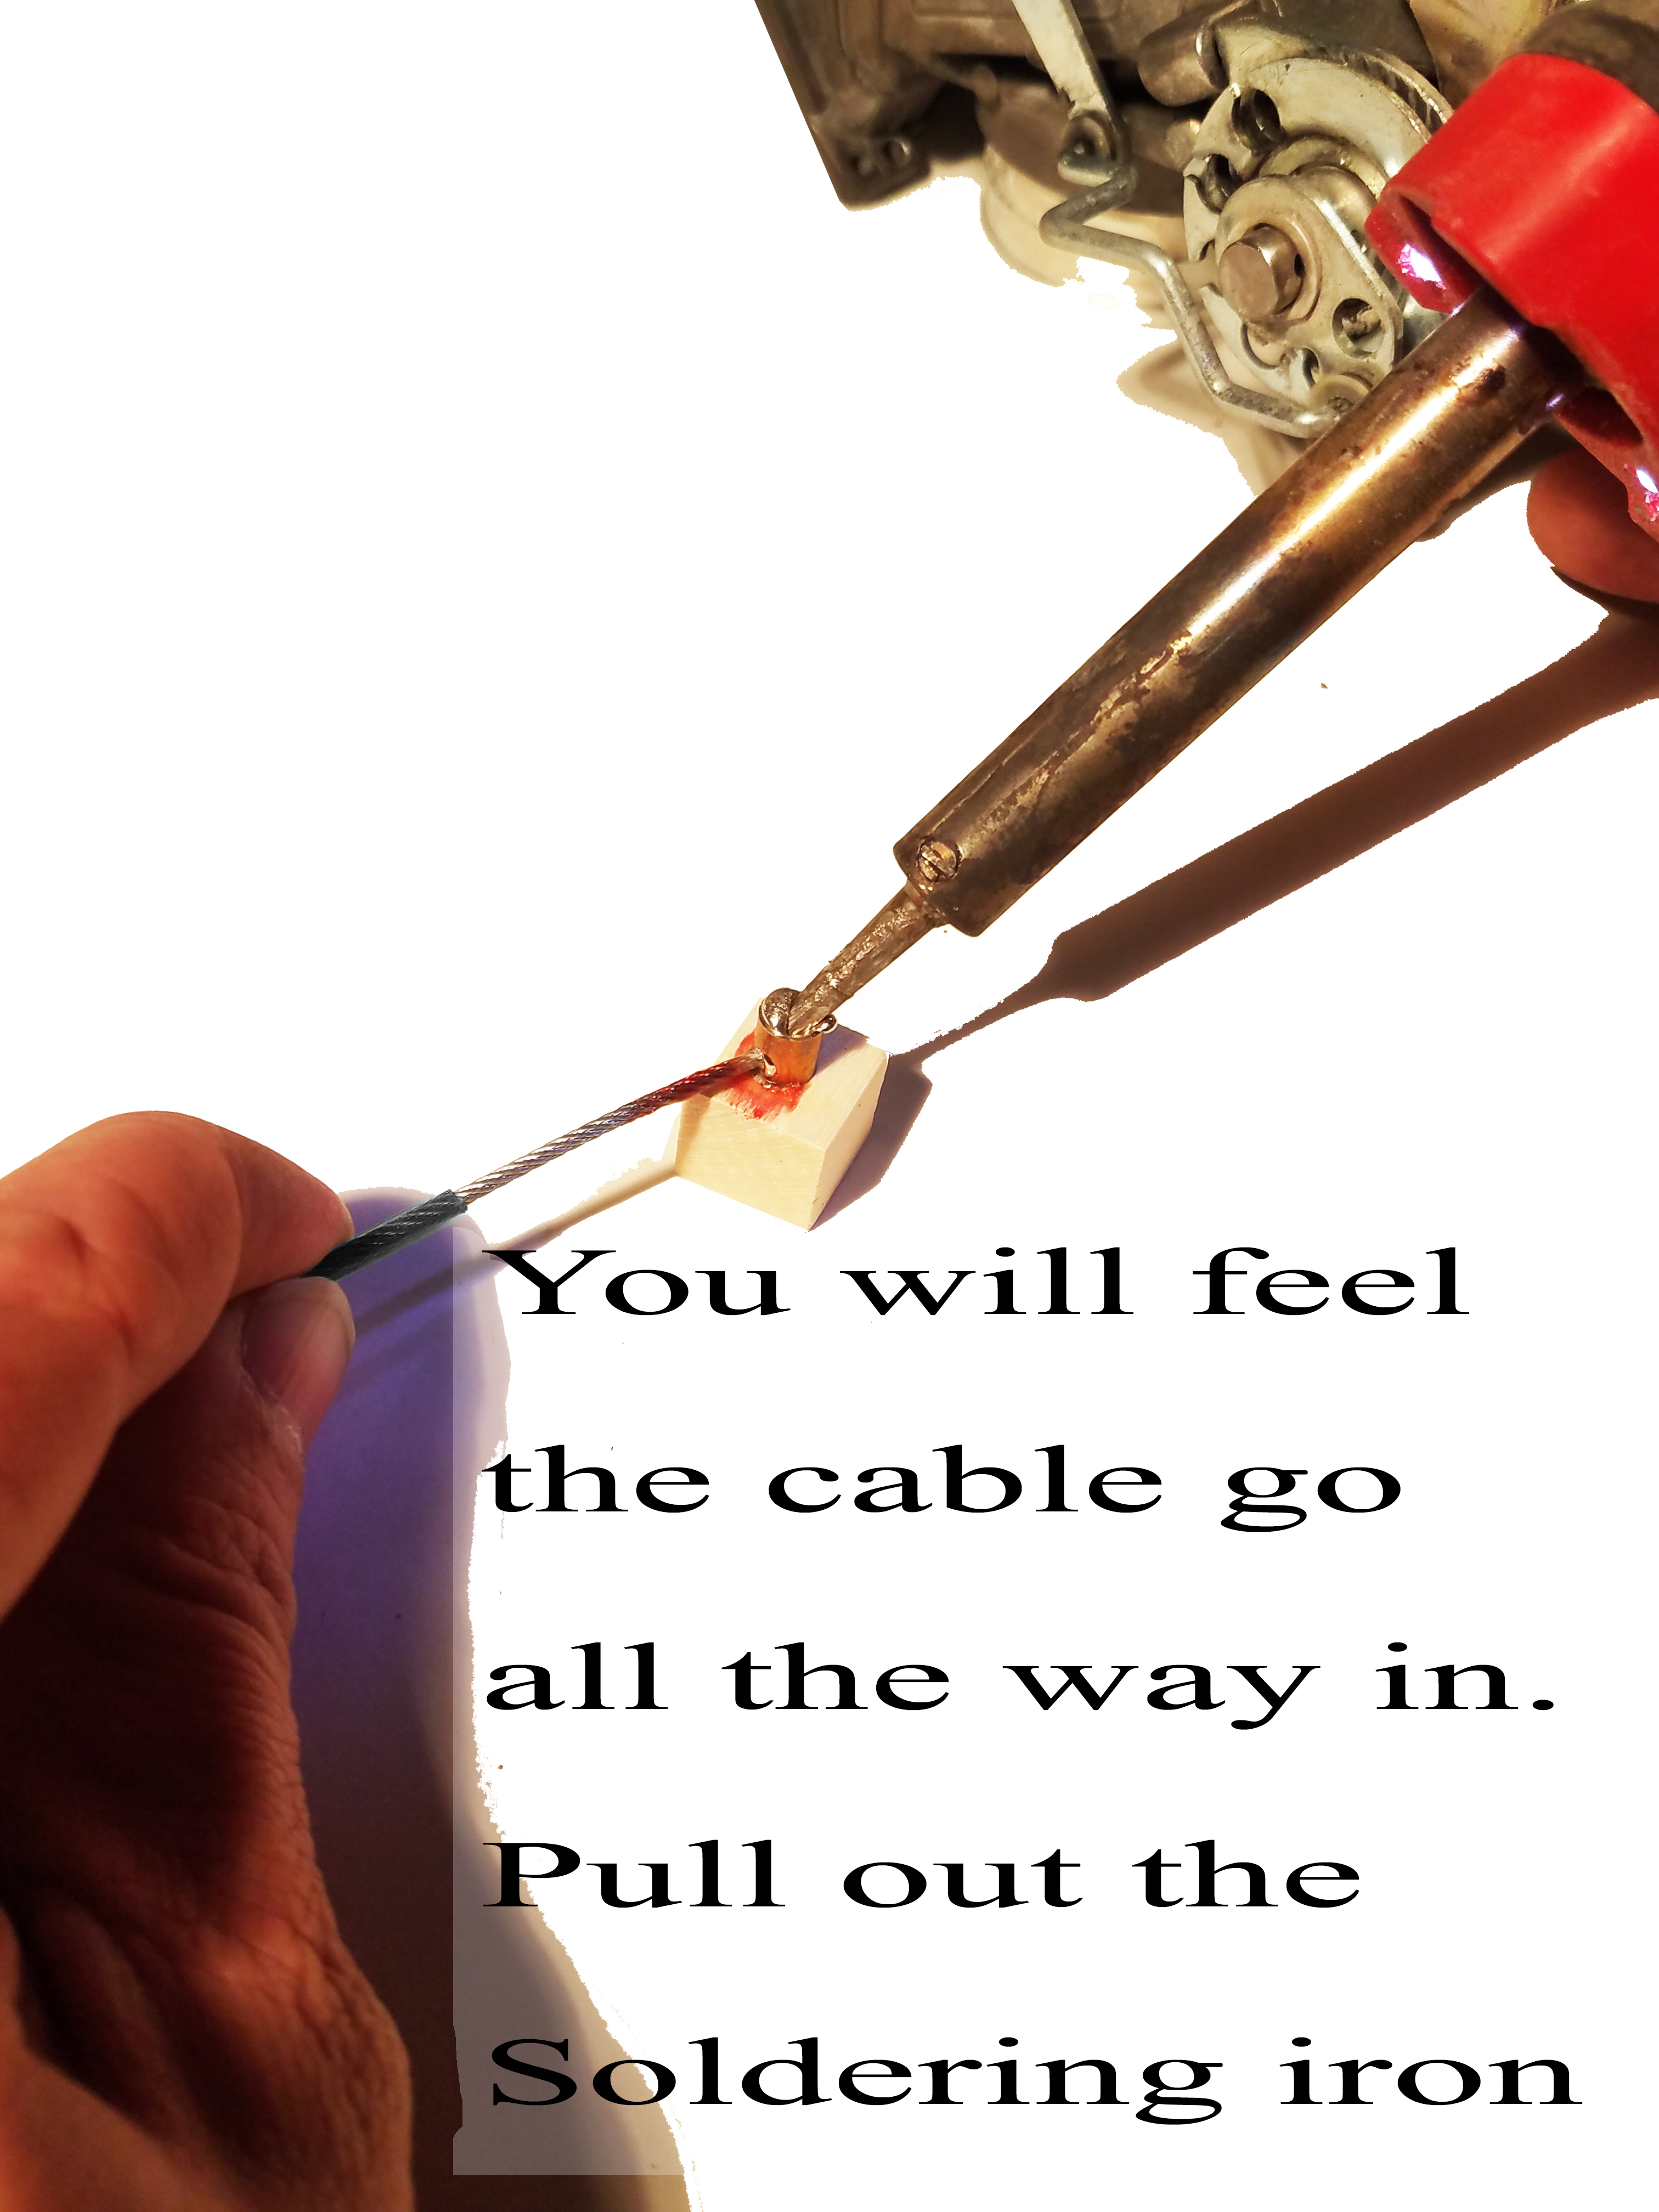
You will hear the flux sizzle and when the solder softens push the cable in so it goes in as far it can go. When the solder comes out of the hole and surrounds the cable pull the soldering iron away. After it is cooled enough for the solder to be solid, turn over and heat it up from the other side of the barrel end. Your soldering iron should be inserted into the barrel end and touch the cable. The cable should extend all the way through the barrel end and touch the other side.
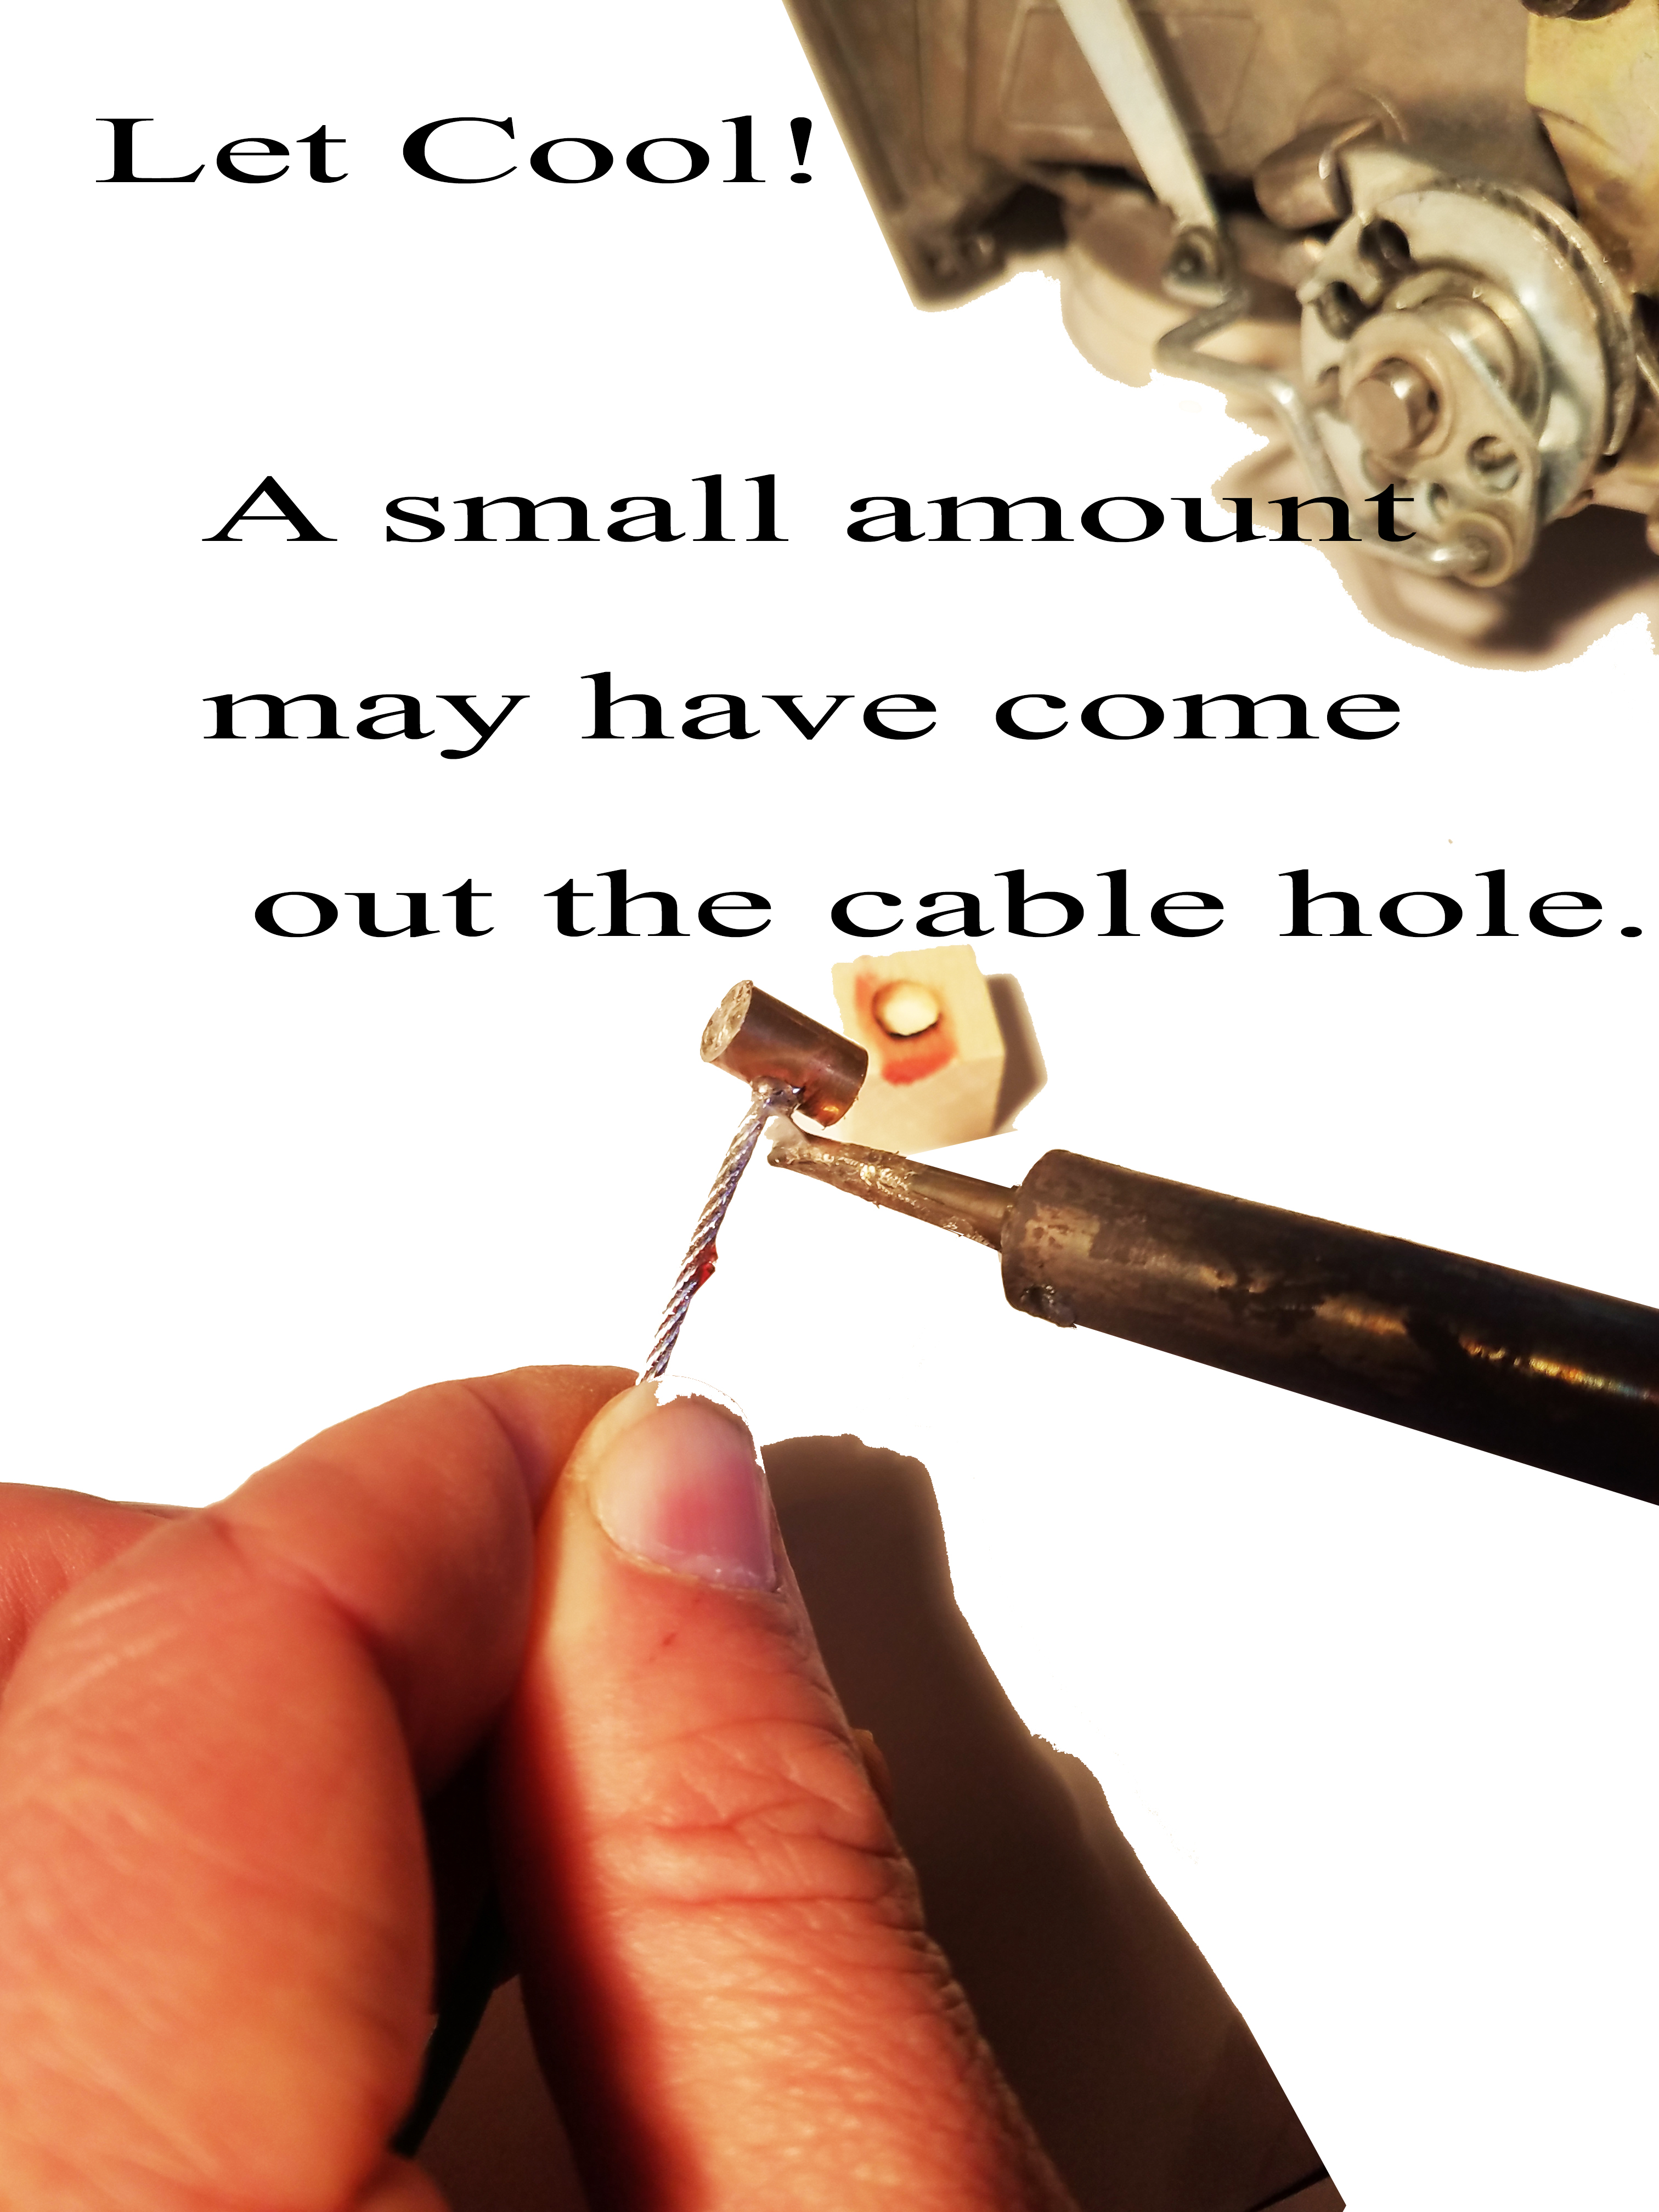
- You end should like the one below.
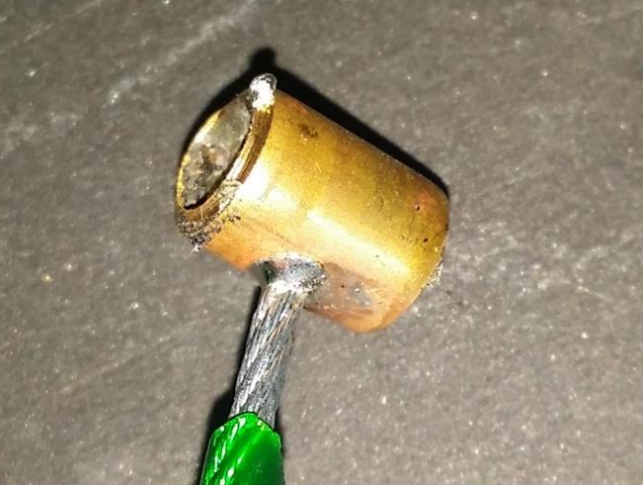
If some of the solder came out of the bottom or the hole the cable goes in don't worry you can clean it off with a small file. If needed you can use additional solder that you received to fully fill the barrel end.
Installation
I did find that if you install on the van you can do the front one easier if you unscrew only the front part.
- When you wind the cables on the pulley you will
need to make sure all the slack is out.
- The first part is to manually open the door fully, BE CAREFUL TO NOT GET THE CABLES STUCK IN THE AREA BY THE SMALL PULLEYS OR THE DOOR RAIL.
Both areas can strip off the green housing or damage the cable another way.

- Then make sure the cables are routed properly through the smaller pulleys. You can see they both come over the outer pulley and under the inner pulley.
- Then reinsert the cable into the main pulley.
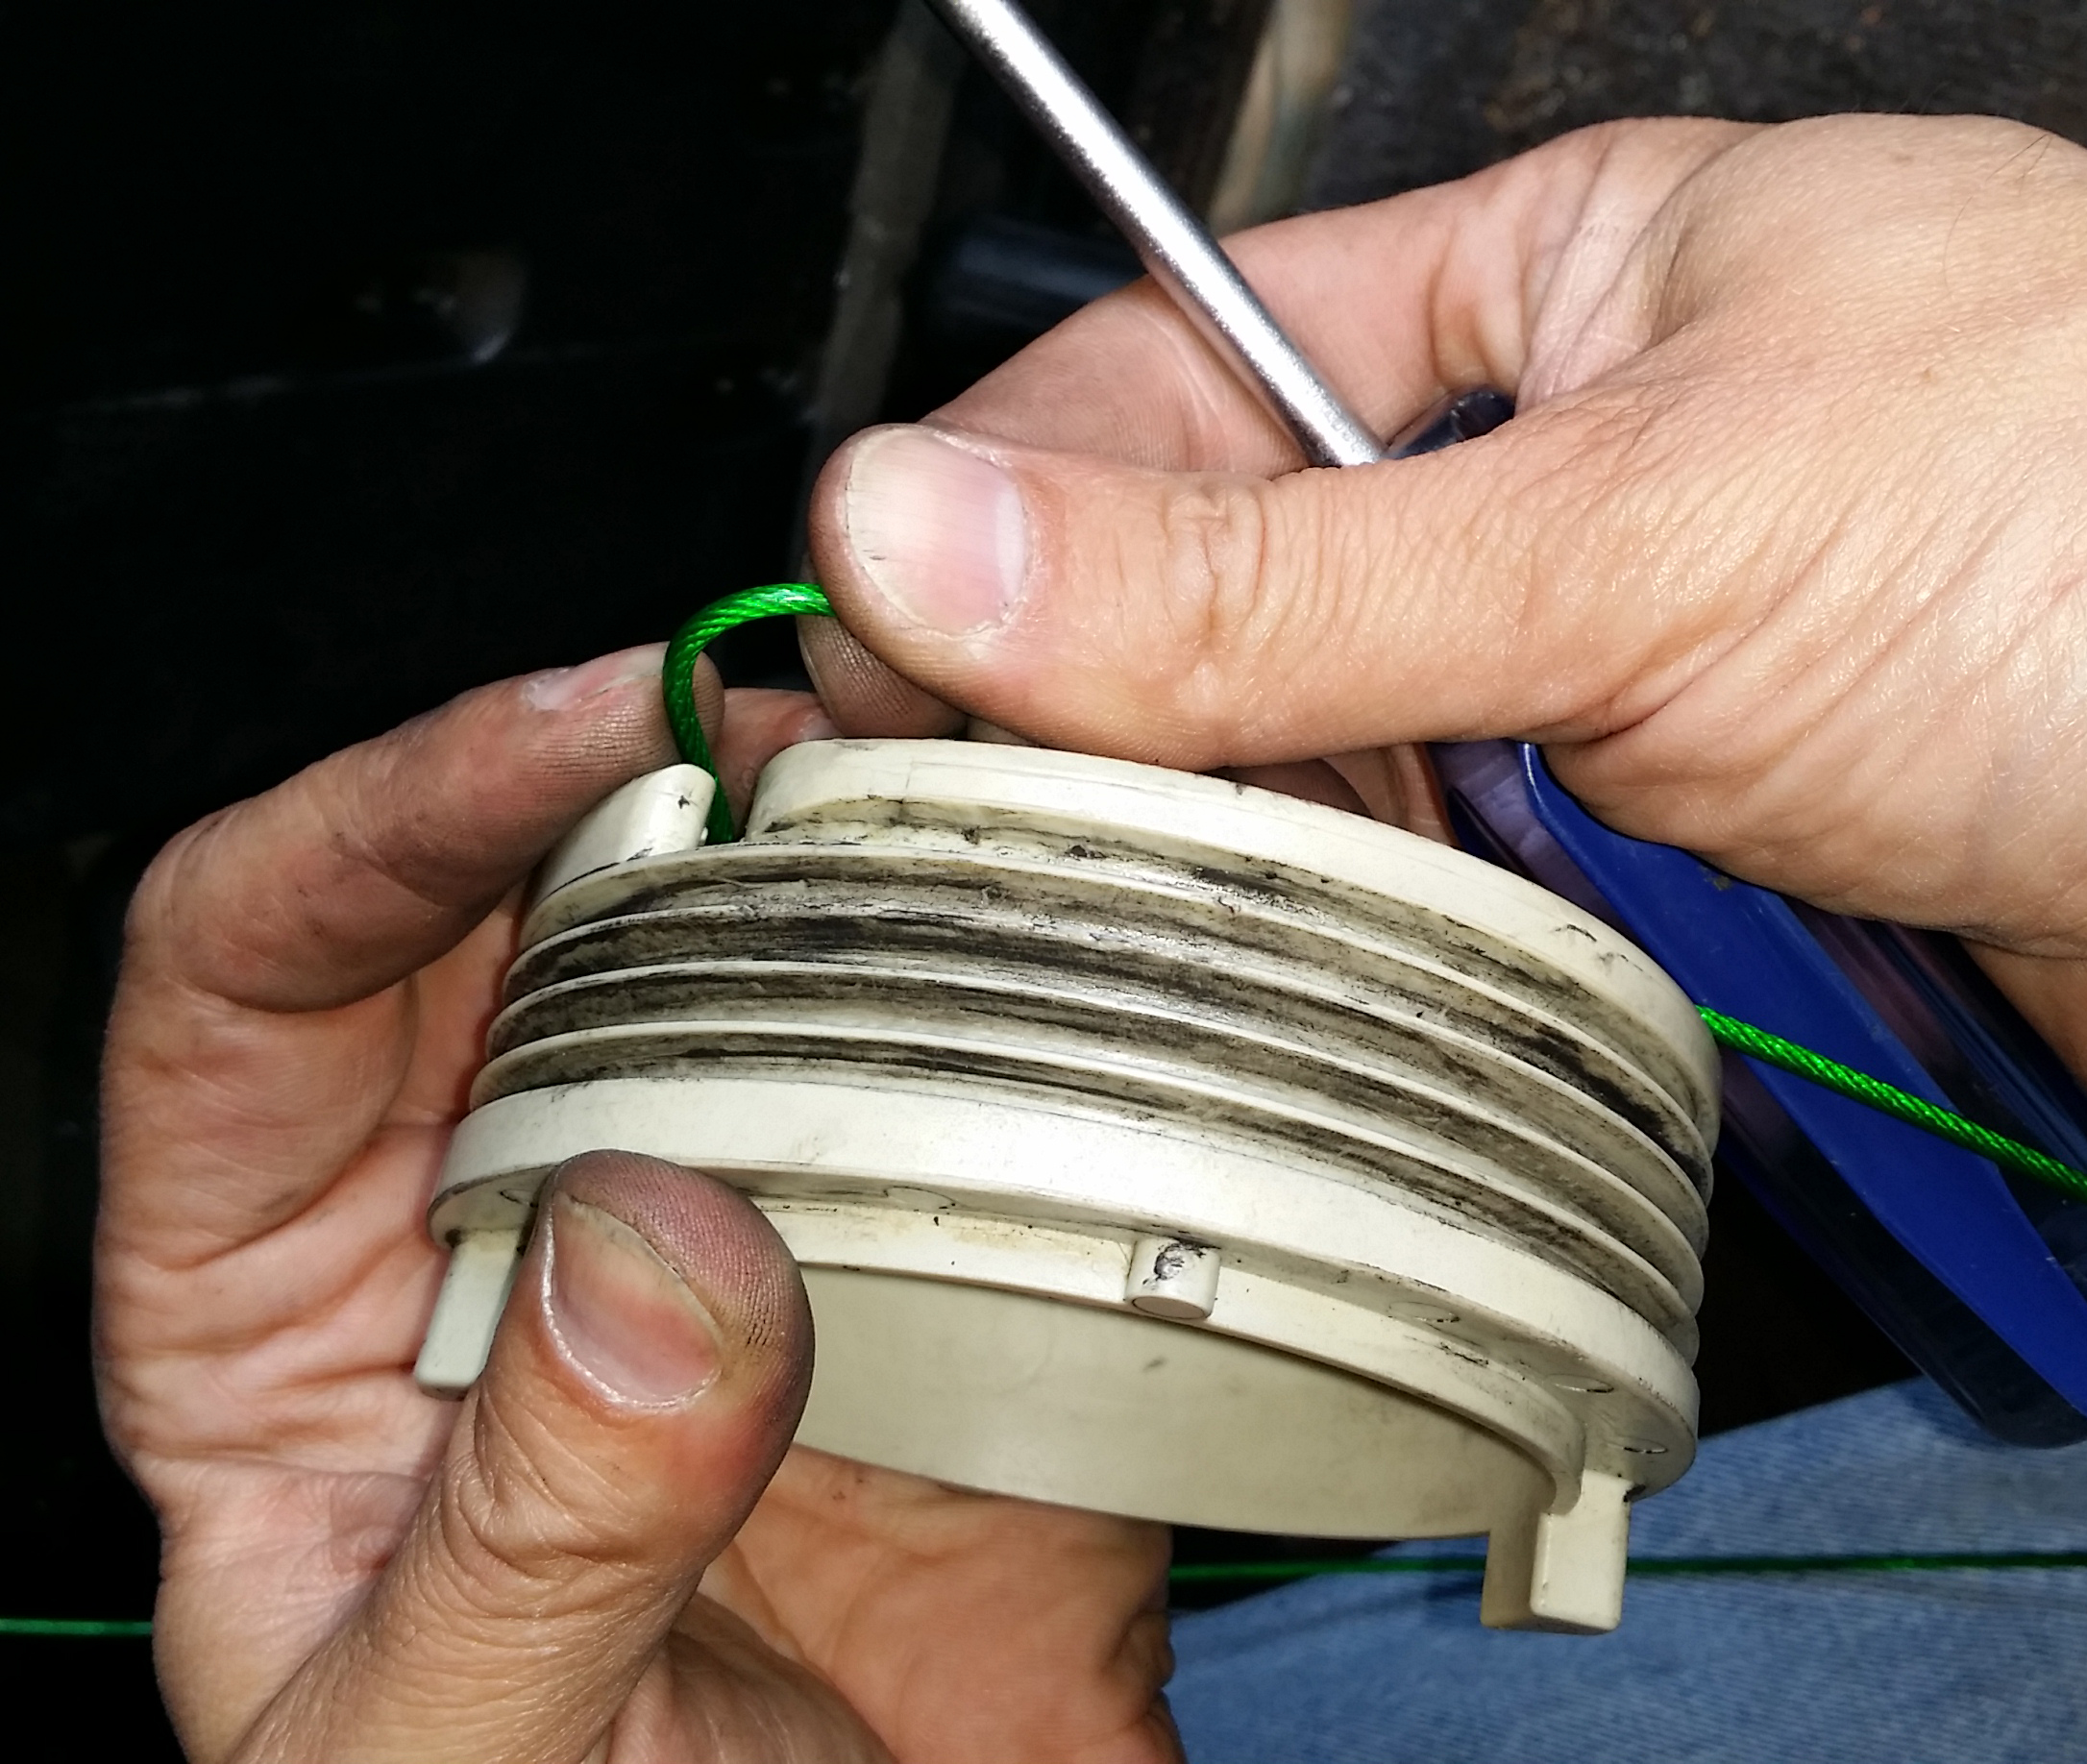
- Wind as shown.
- Now put the cable on the front part of the
pulley
- Put on the nut and spring
- Get the slack out by turning the front part
- Manually open and shut the door
- When you are confident it works connect the power
- Follow the door testing instructions in the video on YouTube.
- Sometimes the door will not open fully, this is
due to the computer thinking the door is in a different location than it
actually is. The Honda factory manual recommendation is to home the door.
- open the door fully manually.
- Using the dash button (NOT THE KEY FOB BUTTON) close the door and hold the button down until the door is fully closed and finished with the closing process.
- This will home the door.
- If it fails to home the door, remove the clock fuse from the fuse box at the passenger's side at their feet. Wait ten seconds to clear the door computer, reinstall the fuse, and re-home the door.
Spare Bushing Instructions
Our bushings are not cheap plastic, they are Acetal plastic, also called polyacetal and polyoxymethylene (POM), They have the same life as the original bushings and will not fail like ABS or Styrene. These are made specifically for our purposes.
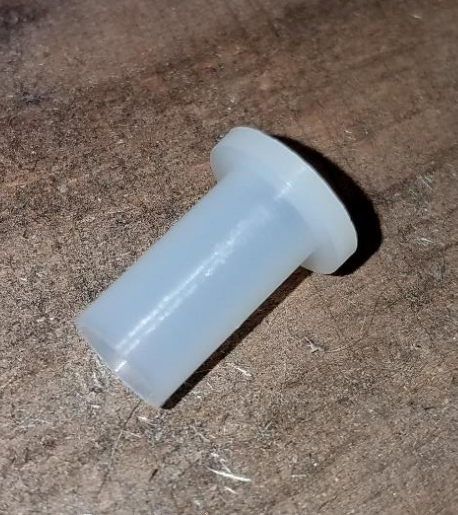
If your bushings are damaged or missing I have enclosed two parts that can be modified to work as bushings. Because you might not need these parts I have put them in unmodified. Follow the instructions below.
The bushing looks like this. It has been specifically tested and has the same material properties as the original plastic bushings on the Honda Odyssey cable ends.
You will need a sharp razor blade. You can't use an old one or a pocket knife. You will be removing the top flange part. Cut as shown. Be careful.
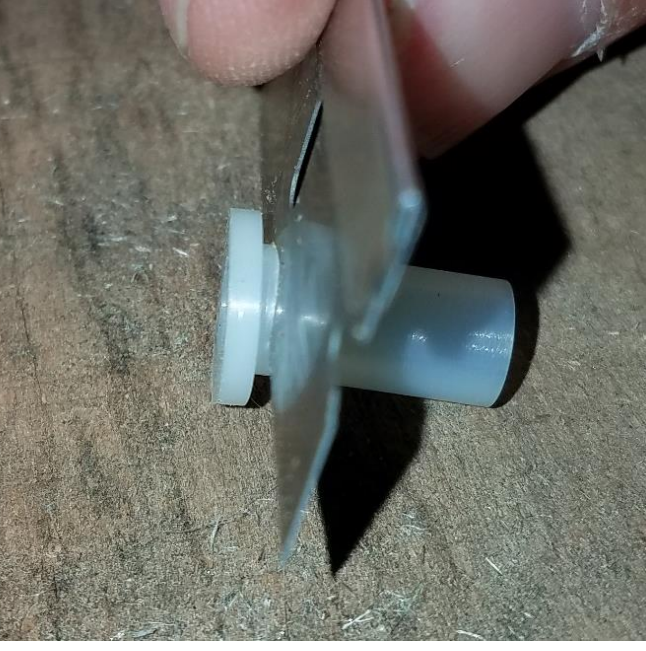
It is not critical the top of the cylinder part is completely flat. But try to cut as close to the flange part. You can then throw the flange part away unless you can use it as a nylon washer for something later.
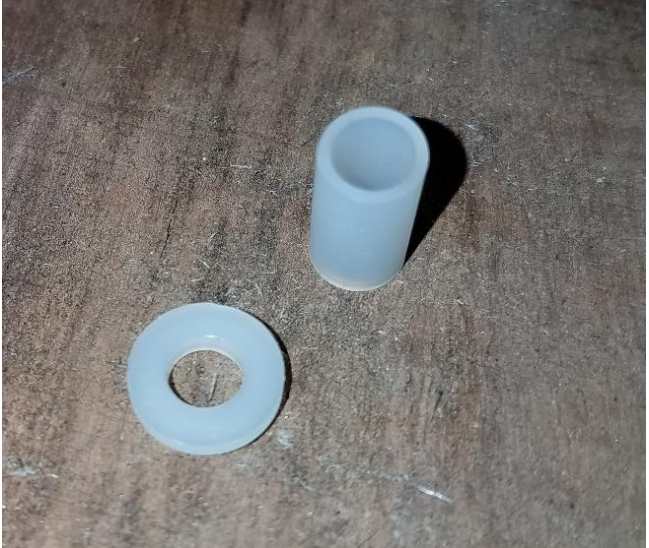
Then cut the cylinder section of lengthwise as shown.
The cut does not have to be straight and it is okay if it cuts down at a slight angle.
When cut open the cylinder and put it on the door end of the cable.
If you have any questions please email us at:
We pride ourselves on our quick response to our customer questions.
Soldering
Our solder is Lead (Pb) and Cadmium (Cd) free. What is Cadmium? It is bad and you don't want it in your van.

Cautions before you start:
- Test fit.
- read the instructions before you start.
- Follow the instructions.
*****The pictures show the protective coating still installed, one inch of the coating should be removed prior to solder.*****
The solder and flux are specially formulated and will work with the steel. This was developed by a metallurgical engineer to work properly and has been tested thoroughly at over 100lbs. Using other solder or flux voids the warranty and can negatively impact the ability for the barrel end remaining on the cable over time.


Pull the soldering iron out and keep the cable pushed into the end. Let cool for approximately one minute.

If your door does not fully close, you may need to home the door. This is because the computer thinks the door is closed by the number rotations of the pulley. You need to pull the fuse to the door and clock. Wait ten seconds put the fuse back in. Then at the dashboard door button (NOT THE FOB) hold the button close until the door fully closes and the locking mechanism engages. Your door is now homed and should operate properly.
Contact@CarCableGuy.com
"72010-TK8-A12 R" is another tiny product line of TitanRCK
>